Yesterday Pam who is on Creating Keepsakes Community sent me the following site that has even better prices. You do have to pay shipping, but the prices are super awesome too. Always love to get the best deals I can and share the information. Just click here http://www.cricutmachine.com/
Hope you all will make the best of all the deals you can find on those Cricut Cartridges!!
Have a Happy Day :)
Blessings,
Carol

Friday, January 28, 2011


Wednesday, January 26, 2011
Awesome Deal!!
My fellow scrapbookers, crafters, cardmakers and more; Boy did I find an awesome deal today. Your asking where did Carol get this deal and what on earth did she get. Well, I purchased the following at Custom Crops, just click on the words and you will arrive at their site.
5 Cricut Cartridges listed below for the following prices. I ended up with free shipping. Yes, I called my husband first to get the "OK" to purchase. We both agreed the price was absolutely right. I only purchase my image cartridges when I can find them on sale, otherwise they are just too expensive. Never have I paid more than $26.00 for any of my cartridges.
Disney Tinkerbell & Friends $21.00
Give A Hoot $23.00
WinterWoodlands $20.00
Pooh & Friends $21.00
Freshly Picked $23.00
Honestly these prices are so hard to beat. WooHoo!! Saved Tons of Money!!!
Have a Happy Creative Day.
Blessings,
Carol
5 Cricut Cartridges listed below for the following prices. I ended up with free shipping. Yes, I called my husband first to get the "OK" to purchase. We both agreed the price was absolutely right. I only purchase my image cartridges when I can find them on sale, otherwise they are just too expensive. Never have I paid more than $26.00 for any of my cartridges.
Disney Tinkerbell & Friends $21.00
Give A Hoot $23.00
WinterWoodlands $20.00
Pooh & Friends $21.00
Freshly Picked $23.00
Honestly these prices are so hard to beat. WooHoo!! Saved Tons of Money!!!
Have a Happy Creative Day.
Blessings,
Carol
Friday, January 14, 2011
Bridal Shower Invitation
Well, it is now January and many people are thinking ahead for the weddings which are to come during the next 11 months. I remember planning our wedding months ahead. This idea I am posting today is for a beautiful Bridal Shower Invitation. Very quick and easy to make. Remember think outside of the box to expand this idea. You can make them in a variety of sizes, papers, embleshments, chalks. The possibilities are endless. When my daughter becomes a bride, we will create everything from our Cricut Expression Machine for her special day.
Items Needed;
Serenade Cartridge, Plant 1 3/4 inch
Your choice of Cardstock, 2 colors
Decorative Corner Rounder
Small Piece of Printed Paper
Clear Liquid Glue
Glitter of Your Choice
Chalks, Cotton Balls
Cricut Blade Settings; Speed and Pressure Med, Blade 5
What you want you want to do is cut a piece of light colored cardstock to 5 1/2 X 8 1/2. This is the base for the invitation. Cut an 8 inch long by 1 inch wide strip of printed paper. Alright, place the base of the invitation into the Cricut Cutting Machine, move the cutting blade to the place on the paper where you want the image to cut (when choosing the image make sure to press the landscape button, it makes the image cut vertically).
Cut the same image you choose on the second color of cardstock. Brush clear glue on the image and sprinkle with glitter. Let this dry for at least 30 minutes before placing on base invitation. Glue the printed paper strip onto the invitation.
On your computer type of the wording you would like to put on the invitation. Use a thicker piece of paper or just cardstock in a lighter color to print it on. Cut the paper of the wording down to 3.75 inches wide by 5 inches long. Use chalks with a cotton ball to lightly add color to the paper. Use colors that match the papers you are using.
Enjoy and have fun with this.
Blessings,
Carol

Items Needed;
Serenade Cartridge, Plant 1 3/4 inch
Your choice of Cardstock, 2 colors
Decorative Corner Rounder
Small Piece of Printed Paper
Clear Liquid Glue
Glitter of Your Choice
Chalks, Cotton Balls
Cricut Blade Settings; Speed and Pressure Med, Blade 5
What you want you want to do is cut a piece of light colored cardstock to 5 1/2 X 8 1/2. This is the base for the invitation. Cut an 8 inch long by 1 inch wide strip of printed paper. Alright, place the base of the invitation into the Cricut Cutting Machine, move the cutting blade to the place on the paper where you want the image to cut (when choosing the image make sure to press the landscape button, it makes the image cut vertically).
Cut the same image you choose on the second color of cardstock. Brush clear glue on the image and sprinkle with glitter. Let this dry for at least 30 minutes before placing on base invitation. Glue the printed paper strip onto the invitation.
On your computer type of the wording you would like to put on the invitation. Use a thicker piece of paper or just cardstock in a lighter color to print it on. Cut the paper of the wording down to 3.75 inches wide by 5 inches long. Use chalks with a cotton ball to lightly add color to the paper. Use colors that match the papers you are using.
Enjoy and have fun with this.
Blessings,
Carol
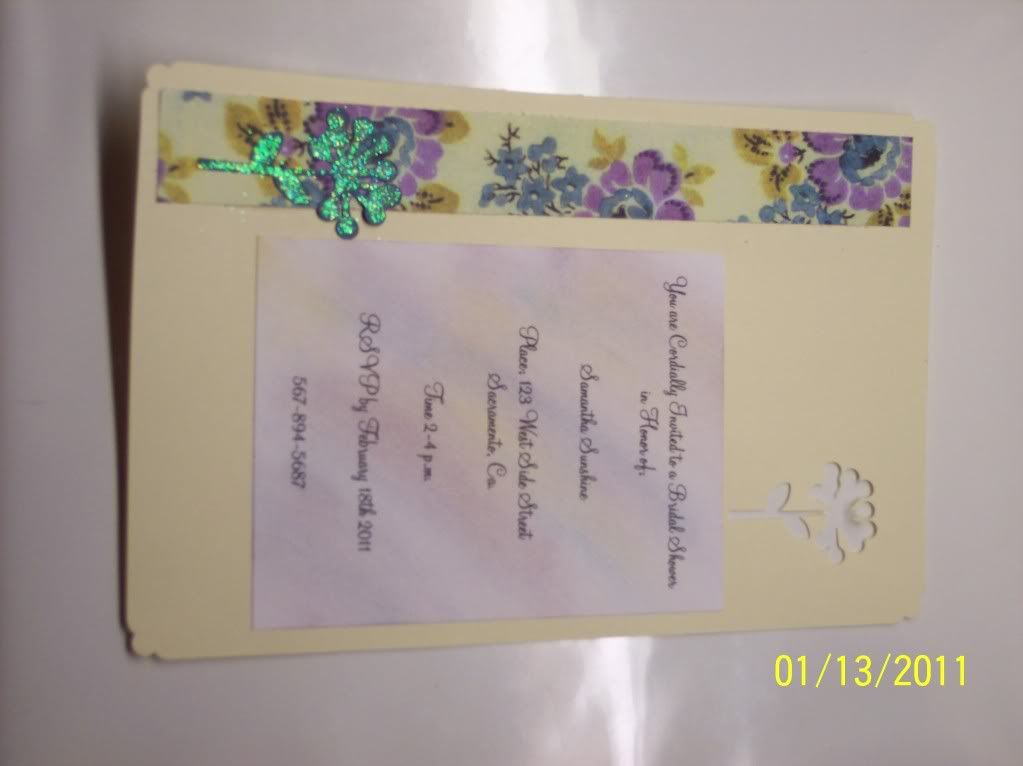
*This is an orginal creation
Tuesday, December 21, 2010
Christmas
Hi there, we have had alot going on in our lives the last four weeks. I have wanted to post but life just happens sometimes you know. One of them is our camera broke. We had to visit Best Buy and they sent it in to get it fixed. Hoping to get it back real soon. Had to borrow my daughters camera last week for our son's birthday and now for Christmas. My scrapbooking room has been chocked full of christmas boxes and a Christmas project that my husband is working on for our daughter. Needless to say nothing has gotten done. :(
Well, the good news is that after New Years I will have several new projects which include using the Cricut and sewing projects to post. Super excited!! Also, I am going to be giving away some of the projects on the site. More info to come. Can't wait to start scrapbooking again too.
My hope for you all is a Very Merry Christmas. Remember that Jesus is the Reason for The Season.
Blessings,
Carol
Well, the good news is that after New Years I will have several new projects which include using the Cricut and sewing projects to post. Super excited!! Also, I am going to be giving away some of the projects on the site. More info to come. Can't wait to start scrapbooking again too.
My hope for you all is a Very Merry Christmas. Remember that Jesus is the Reason for The Season.
Blessings,
Carol
Friday, November 19, 2010
Thanksgiving Right Around The Corner
Good morning everyone. Today in California it is about to rain. Our nice sunny weather is leaving us today. Oh well, bound to happen soon enough for it is November now.
We are so looking forward to next week being with our church family on this special day. We have not had the traditional meal in several years. Here is what we have had in the past 4 years we have had Thai, Mexican, BBQ, and this year roast pork with sauteed veggies,homemade sweet dinner rolls and fresh green salad, plus dessert. Looking forward to just spending the day with the people we love.
May your Thanksgiving be wonderful and blessed.
Blessings,
Carol
We are so looking forward to next week being with our church family on this special day. We have not had the traditional meal in several years. Here is what we have had in the past 4 years we have had Thai, Mexican, BBQ, and this year roast pork with sauteed veggies,homemade sweet dinner rolls and fresh green salad, plus dessert. Looking forward to just spending the day with the people we love.
May your Thanksgiving be wonderful and blessed.
Blessings,
Carol
Wednesday, November 10, 2010
Thanks Giving Place Cards
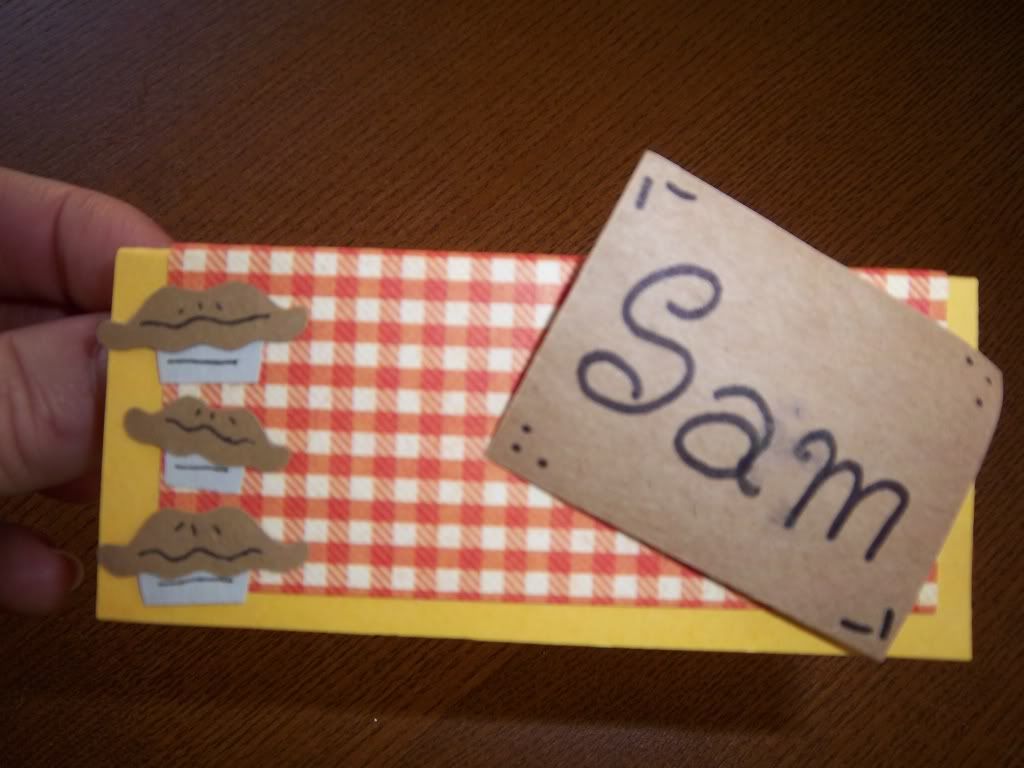
Ok, these turned out really cute. I will be making 5 more for our Thanks Giving Feast which is coming up real soon. Super easy to make and you could use stamps for the image if you don't happen to have a Cricut machine. Think outside of the box as I always say. Lots of uses for the place cards too. You could use them as tags for gifts, labeling food at a buffet, and much more.
Items needed;
Cricut Machine
Plain and Printed Cardstock Paper
Black Pen
Craft Glue
Sticky Dots or Foam Squares
Cricut Cartridge (Speaking of Fall)
Instructions;
Cut out 1 - 2 inch E use the layer button, this makes the top of the pies.
Cut out 1- 2 inch E use the trifold card and shift button. Just cut off the unwanted pieces. This makes the bottom of the pie. I used a grayish colored paper so it would look like a pie tin.
Take your glue and glue the pieces of the pie together and then make the markings on the pie and tin with the black marker.
For the base of the place card you will need to cut a 3 1/2 X 4 inch square. I used my paper cutter, this made is super easy. For the printed piece, I just cut it a little smaller for the base would show around the edges. Just glue the printed square to the solid square. Let dry then fold in half.
To make the square for the name, cut out a 2 X 1 1/2 inch square and write name or even stamp name with letter stamps. Attach to place card with sticky dot or foam sqare.
Now glue the pies onto the place card.
In no time at all, you have super cute place cards that will brighten up any Thanks Giving table. Have fun with it!!
Blessings,
Carol
*This is an orginal creation.


Items needed;
Cricut Machine
Plain and Printed Cardstock Paper
Black Pen
Craft Glue
Sticky Dots or Foam Squares
Cricut Cartridge (Speaking of Fall)
Instructions;
Cut out 1 - 2 inch E use the layer button, this makes the top of the pies.
Cut out 1- 2 inch E use the trifold card and shift button. Just cut off the unwanted pieces. This makes the bottom of the pie. I used a grayish colored paper so it would look like a pie tin.
Take your glue and glue the pieces of the pie together and then make the markings on the pie and tin with the black marker.
For the base of the place card you will need to cut a 3 1/2 X 4 inch square. I used my paper cutter, this made is super easy. For the printed piece, I just cut it a little smaller for the base would show around the edges. Just glue the printed square to the solid square. Let dry then fold in half.
To make the square for the name, cut out a 2 X 1 1/2 inch square and write name or even stamp name with letter stamps. Attach to place card with sticky dot or foam sqare.
Now glue the pies onto the place card.
In no time at all, you have super cute place cards that will brighten up any Thanks Giving table. Have fun with it!!
Blessings,
Carol
*This is an orginal creation.

Sunday, November 7, 2010
Tough Week
Well, if your a parent you know how things can change in an instant. Last week I did not get to post anything, for myself and my two children were sick. We had that sinus cold, which was not much fun at all.
I just wanted to let you all know that in a couple of days I will be posting the instructions for Thanks Giving place cards. Believe me these turned out really neat.
Come on back for that fun craft.
I just wanted to let you all know that in a couple of days I will be posting the instructions for Thanks Giving place cards. Believe me these turned out really neat.
Come on back for that fun craft.
Subscribe to:
Posts (Atom)