Hi there, we have had alot going on in our lives the last four weeks. I have wanted to post but life just happens sometimes you know. One of them is our camera broke. We had to visit Best Buy and they sent it in to get it fixed. Hoping to get it back real soon. Had to borrow my daughters camera last week for our son's birthday and now for Christmas. My scrapbooking room has been chocked full of christmas boxes and a Christmas project that my husband is working on for our daughter. Needless to say nothing has gotten done. :(
Well, the good news is that after New Years I will have several new projects which include using the Cricut and sewing projects to post. Super excited!! Also, I am going to be giving away some of the projects on the site. More info to come. Can't wait to start scrapbooking again too.
My hope for you all is a Very Merry Christmas. Remember that Jesus is the Reason for The Season.
Blessings,
Carol

Tuesday, December 21, 2010
Friday, November 19, 2010
Thanksgiving Right Around The Corner
Good morning everyone. Today in California it is about to rain. Our nice sunny weather is leaving us today. Oh well, bound to happen soon enough for it is November now.
We are so looking forward to next week being with our church family on this special day. We have not had the traditional meal in several years. Here is what we have had in the past 4 years we have had Thai, Mexican, BBQ, and this year roast pork with sauteed veggies,homemade sweet dinner rolls and fresh green salad, plus dessert. Looking forward to just spending the day with the people we love.
May your Thanksgiving be wonderful and blessed.
Blessings,
Carol
Wednesday, November 10, 2010
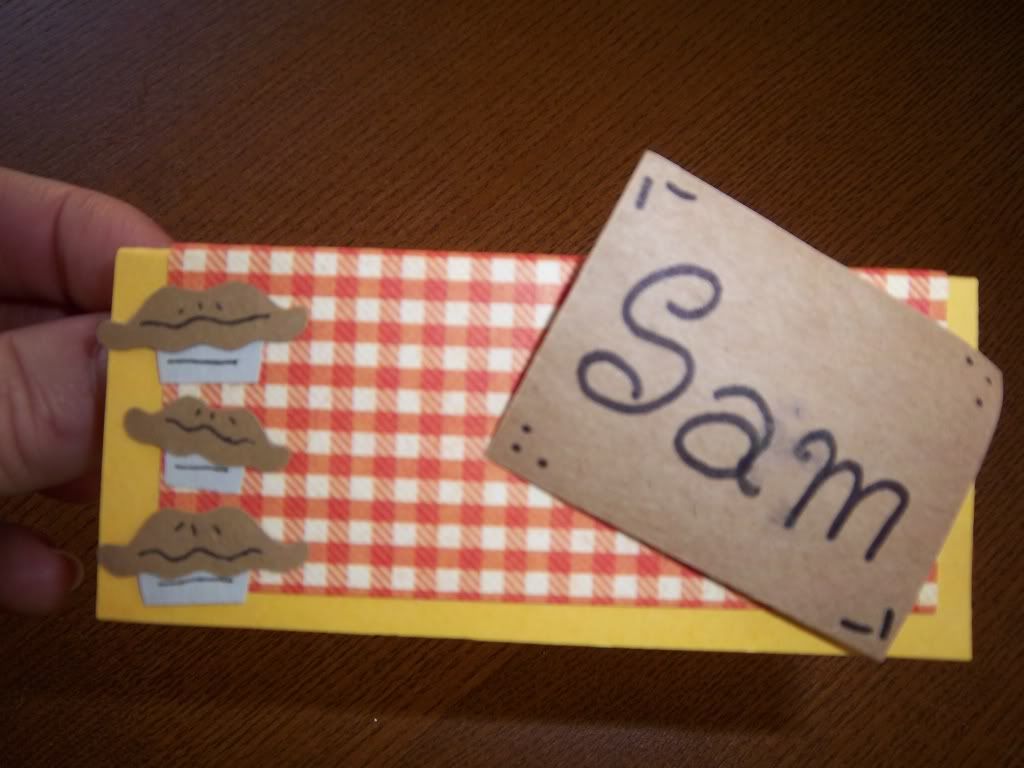
Thanks Giving Place Cards
Ok, these turned out really cute. I will be making 5 more for our Thanks Giving Feast which is coming up real soon. Super easy to make and you could use stamps for the image if you don't happen to have a Cricut machine. Think outside of the box as I always say. Lots of uses for the place cards too. You could use them as tags for gifts, labeling food at a buffet, and much more.
Items needed;
Cricut Machine
Plain and Printed Cardstock Paper
Black Pen
Craft Glue
Sticky Dots or Foam Squares
Cricut Cartridge (Speaking of Fall)
Instructions;
Cut out 1 - 2 inch E use the layer button, this makes the top of the pies.
Cut out 1- 2 inch E use the trifold card and shift button. Just cut off the unwanted pieces. This makes the bottom of the pie. I used a grayish colored paper so it would look like a pie tin.
Take your glue and glue the pieces of the pie together and then make the markings on the pie and tin with the black marker.
For the base of the place card you will need to cut a 3 1/2 X 4 inch square. I used my paper cutter, this made is super easy. For the printed piece, I just cut it a little smaller for the base would show around the edges. Just glue the printed square to the solid square. Let dry then fold in half.
To make the square for the name, cut out a 2 X 1 1/2 inch square and write name or even stamp name with letter stamps. Attach to place card with sticky dot or foam sqare.
Now glue the pies onto the place card.
In no time at all, you have super cute place cards that will brighten up any Thanks Giving table. Have fun with it!!
Blessings,
Carol
*This is an orginal creation.
Sunday, November 7, 2010
Tough Week
Well, if your a parent you know how things can change in an instant. Last week I did not get to post anything, for myself and my two children were sick. We had that sinus cold, which was not much fun at all.
I just wanted to let you all know that in a couple of days I will be posting the instructions for Thanks Giving place cards. Believe me these turned out really neat.
Come on back for that fun craft.
I just wanted to let you all know that in a couple of days I will be posting the instructions for Thanks Giving place cards. Believe me these turned out really neat.
Come on back for that fun craft.
Friday, October 29, 2010
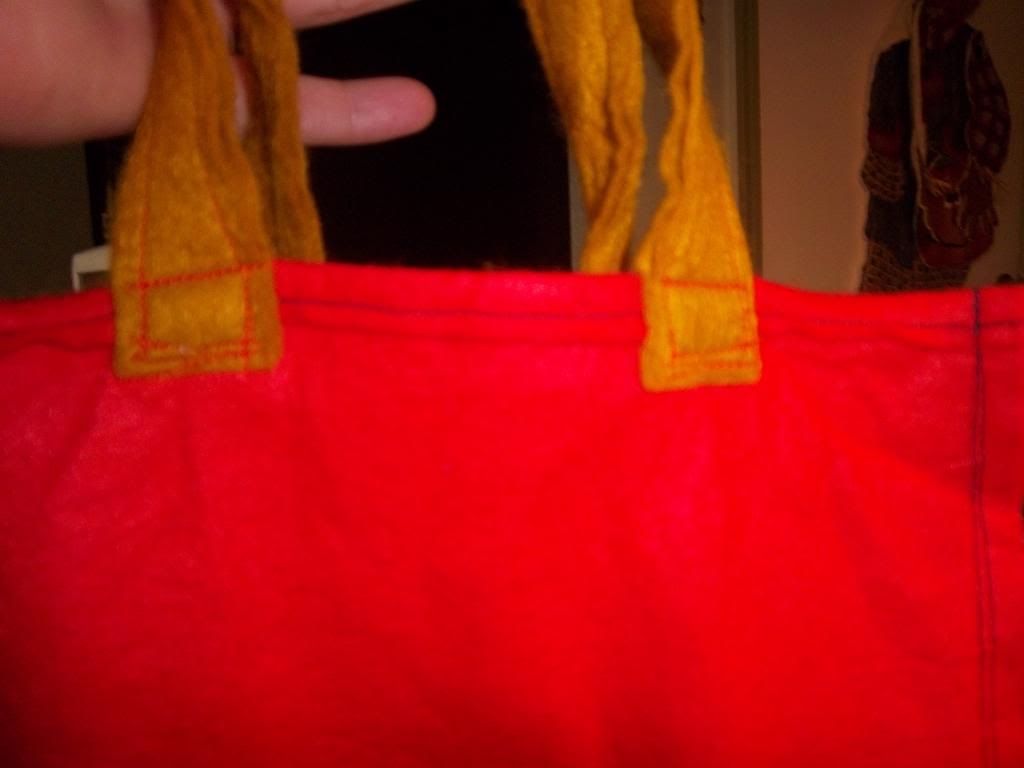
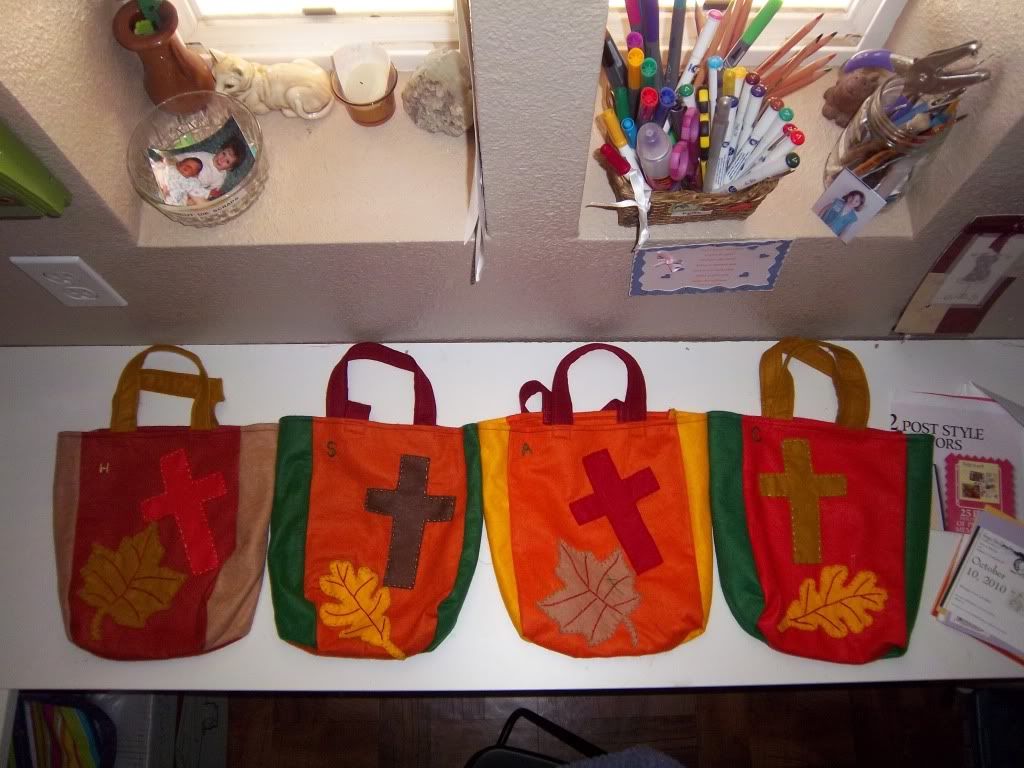
Cute Goodie Bags
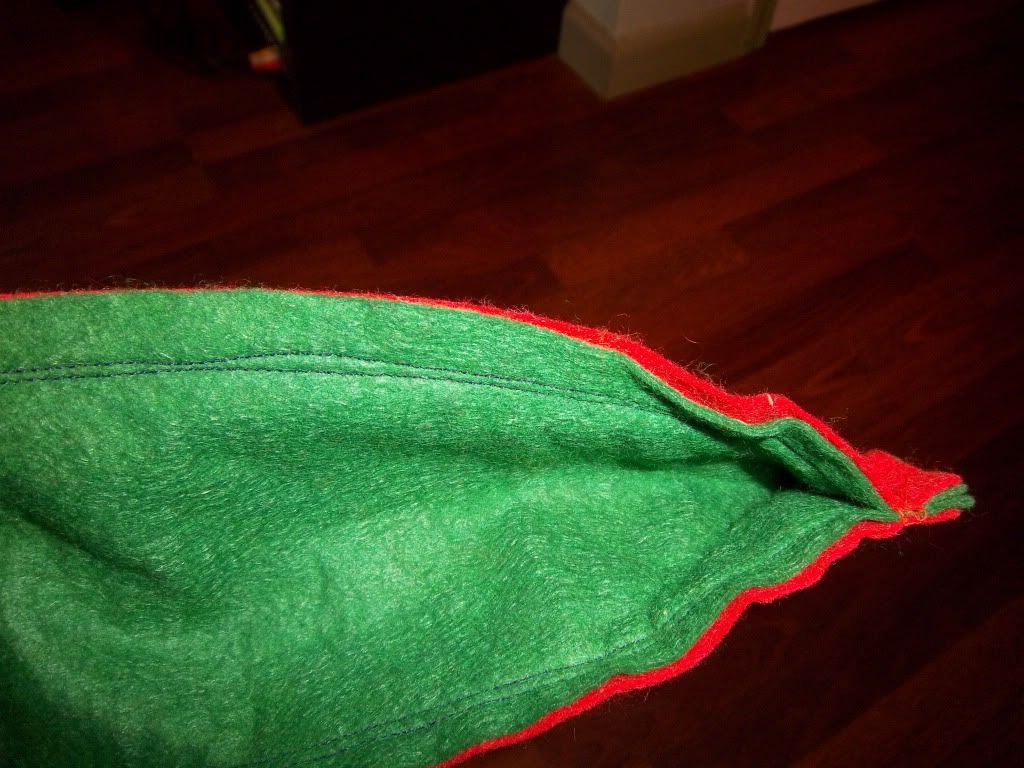
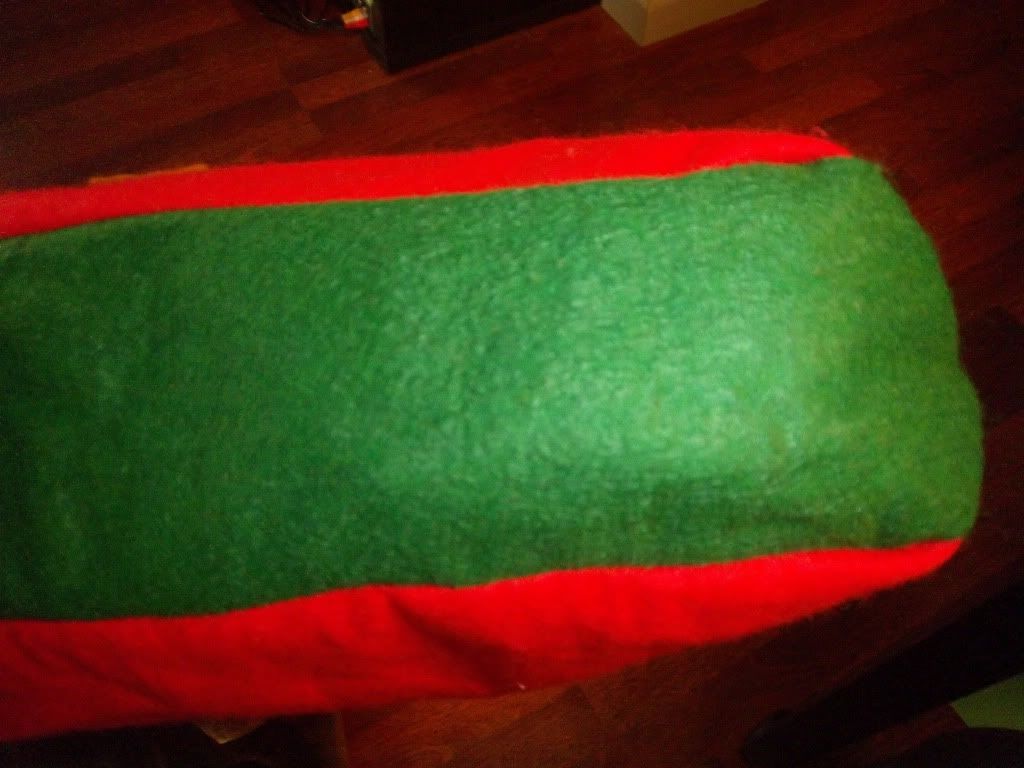
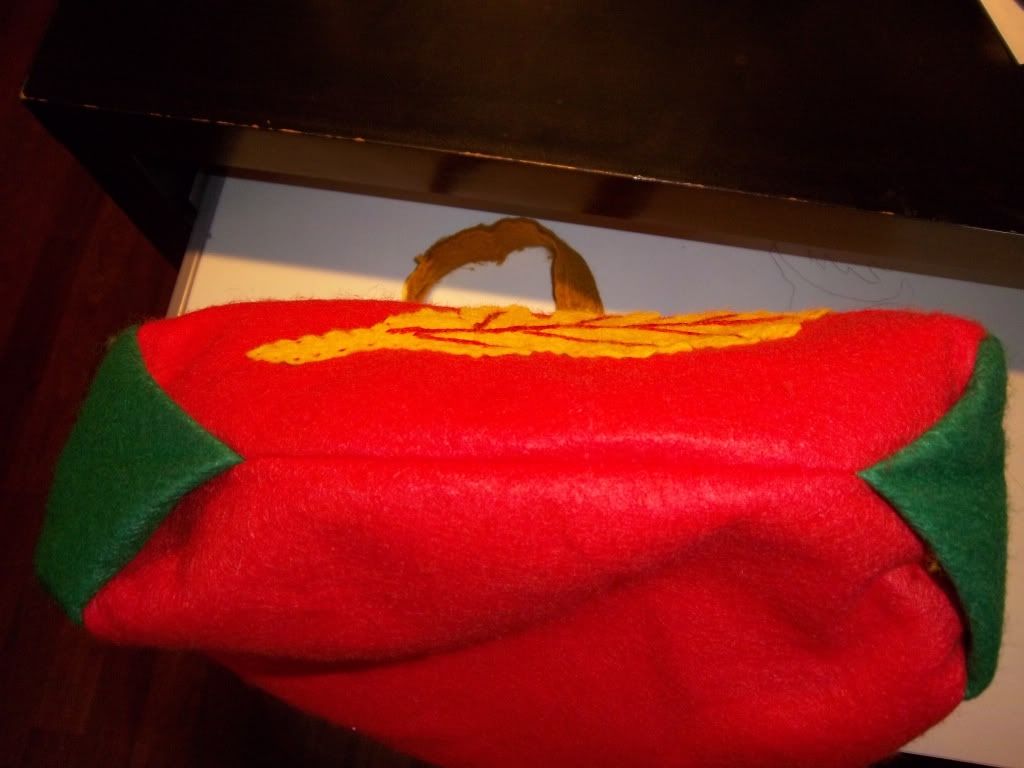
These bags can be used for a variety of things. Treats, gifts, school stuff and more. Just use your imagination and see what you can use them for. Also, this project was not used using the Cricut Expression machine, but you could however use your Cricut for cutting out images. Just use the iron on material backing and iron onto the back of any fabric then use a Cricut Cartridge of your choice, cut out and iron onto the front of the bag.
With this project I made the cross and downloaded the image of the leaf from the internet.
Here are the items you need to get;
Felt 8 1/2 X 11 1/2 pieces (4)
Some type of Image, either cut on Cricut or by hand
Sewing Machine
Needle and Embroidery Thread
Sew double seams to make the seams stronger. If you have any questions, please email me and I will guide you in the right direction.
Before you begin sewing the pieces together, take one of the large front pieces and attach your cut out images to the front of it. So much easier to do it now than after the bag is sewed together. You can just use simple stitches to attach the cut out images.
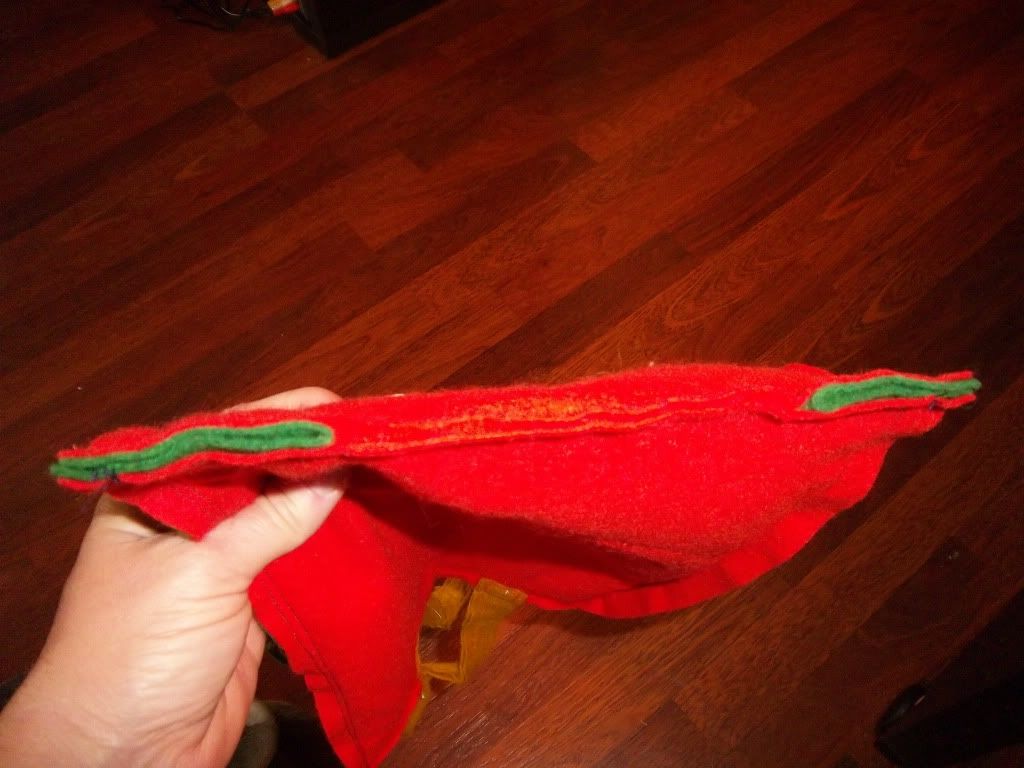
Take one of the felt pieces and cut it in half lengthwise. You will end up with 2, 2 1/2 X 11 1/2 pieces for the side of your bag. Now take another piece of felt and cut 2, 2 X 11 1/2 pieces for the handles of your bag.
First, sew one of the large pieces of felt to one of the side pieces, then sew a large piece to the small piece and now the existing side piece to the large one. That will give you front and sides. Turn the top edges of the bag down a little to create a finished looking edge and sew with machine.
Next you want to take the 2 inch pieces which are for the handles, and sew them lengthwise around the edge. You end up with 1 X 11 1/2 inch handles. Sew handles on the inside of the bag, one set to the front and one set for the back.
In order to have a bag with a nice looking bottom you have to turn your bag inside out first. Then fold the sides inward (like folding a piece of paper in half). See Photo. Now sew the bottom and turn inside out.
There you have it. A cute little bag that can be used for many things.
We used these bags on Tuesday of this week for the Mickey's Harvest Party (that's what we call it). We had alot of candy in them, and the bags held up well. No problems at all. Sewing the double edges did the trick. Also, I embroidered our initial on the front of the bag.
*Please note this is an orginal creation.
With this project I made the cross and downloaded the image of the leaf from the internet.
Here are the items you need to get;
Felt 8 1/2 X 11 1/2 pieces (4)
Some type of Image, either cut on Cricut or by hand
Sewing Machine
Needle and Embroidery Thread
Sew double seams to make the seams stronger. If you have any questions, please email me and I will guide you in the right direction.
Before you begin sewing the pieces together, take one of the large front pieces and attach your cut out images to the front of it. So much easier to do it now than after the bag is sewed together. You can just use simple stitches to attach the cut out images.
Take one of the felt pieces and cut it in half lengthwise. You will end up with 2, 2 1/2 X 11 1/2 pieces for the side of your bag. Now take another piece of felt and cut 2, 2 X 11 1/2 pieces for the handles of your bag.
First, sew one of the large pieces of felt to one of the side pieces, then sew a large piece to the small piece and now the existing side piece to the large one. That will give you front and sides. Turn the top edges of the bag down a little to create a finished looking edge and sew with machine.
Next you want to take the 2 inch pieces which are for the handles, and sew them lengthwise around the edge. You end up with 1 X 11 1/2 inch handles. Sew handles on the inside of the bag, one set to the front and one set for the back.
In order to have a bag with a nice looking bottom you have to turn your bag inside out first. Then fold the sides inward (like folding a piece of paper in half). See Photo. Now sew the bottom and turn inside out.
There you have it. A cute little bag that can be used for many things.
We used these bags on Tuesday of this week for the Mickey's Harvest Party (that's what we call it). We had alot of candy in them, and the bags held up well. No problems at all. Sewing the double edges did the trick. Also, I embroidered our initial on the front of the bag.
*Please note this is an orginal creation.
Thursday, October 28, 2010
Just Back from Vacation
Good morning!! We just arrived back home last night from our Disneyland Vacation of 6 days in the park. Such fun. I will be posting the next couple of days the instructions and photo of the goodie bags I sewed for the Mickey's Harvest Party in the Disneyland Park. They turned out really cute and held up well with all the candy we had in them.
Monday, October 18, 2010
I found this idea on the web for making a beautiful paper flower Bqt. My friend who I gave it too really liked it. Well, I think I will be making more of them in the future. Super easy to make.
Directions:
Cricut cutting machine
Serenade Cricut Cartridge
Plantin Cricut Cartridge
Pretty Cardstock paper (3 different types)
4-5 different types of stamping inks
Cut 3 (4 inch) flowers of your choice
Cut 3 (3 inch) flowers of your choice
Cut 3 (1 inch) shapes, for example bird, butterfly, birdhouse
Cut 1 (5-6 inch) solid flower for the tag on the front of the cone
Cut 1 (3 inch) circle to put on top of the flower tag on fron of the cone.
Cut out letters of choice for saying to put on the 3 inch circle ( 1-1.5 inch should work)
Make sure your speed is high, pressure high and blade at 5
Take the darkest inks first then the lighter ones last, and use a sponge or just wipe the paper on the ink pad to get a little on the paper flower. You will do this with all the inks and it will give the paper flowers a beautiful destressed look.
Let flowers dry, and then stack them together large, med and then small shapes.
Use the Crop A Dile puncher to punch a hole through all three layers of the flowers. Put a large brad through the hole and that will hold the flowers together. Now use some floral wire to wrap around the back of the flower where the brads are, this makes a stem.
Now the flowers are on stems, so you want to add some glitter onto the flower petals. Just use quick drying glue and then sprinkle on the flowers.
While your flowers are drying you want to take a 12 X 12 a piece of printed cardstock and make a cone for the flowers. Just attach some double sided tape to keep the cone together. To make the strip on the cone, just cut a 2 inch piece of cardstock and use some shaped scissors to cut the edges of the strip and then distress it with the inks. Use the double sided tape to connect to the back of the cone.
On each side of the cone put a small hole then but an eyelet in the cone. These holes are so you can attach some type of ribbon or string to hand the Bqt up on the wall.
Make sure to use a hole punch to make the hole for the tag. Connect the tag to the front of the cone first with a brad.
There you go, you now have a beautiful Bqt of flowers.

Subscribe to:
Comments (Atom)