I decided today to change how my background looked. Hope you like it. Much better and reflects more of who I am. Enjoy!!
Blessings,
Carol

Monday, January 31, 2011
Sunday, January 30, 2011
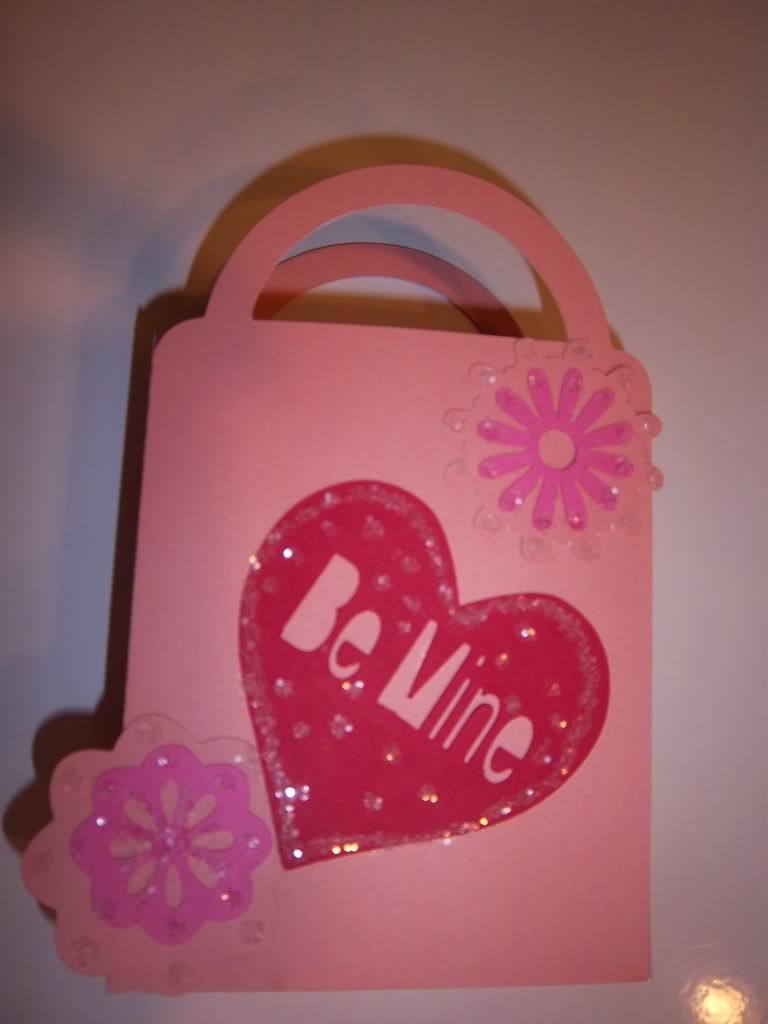
Valentines Bag
I decided the other day to make something fun for Valentines Day. Check out this very cute little bag. Thought it would be fun to put some conversation hearts in it for my kids. Enjoy this fun little craft using your Cricut Machine and Sure Cuts A Lot computer program.
The wording and the heart were done with the SCAL program. For Christmas my husband blessed me greatly with a mini laptop and cd/dvd recording drive. Having the SCAL and laptop has truly opened up a whole new world with my Cricut Expression. I love the fact that I can weld letters together. Sure makes putting words on my projects a whole lot easier. If that was the only thing I used the SCAL program for it is so worth it.
Supplies Needed;
Cricut Cartridge - Plantin School Book
Sure Cuts Alot or Cricut Design Studio
Solid Colored Card Stock
Glitter, Clear Liquid Glue
Sticky Dots
Terrifically Tacky Tape
Blade 5, Speed Low or Med
With your computer program SCAL or Cricut Design Studio create a heart with the words typed into it. See you manual for directions. It actually is very simple. Cut this design out. Next using the Cricut Cartridge Plantin School Book, cut a 7 inch bag.
Cut 2, 1 inch small flowers from which ever cartridge you would like to use. Cut 2, 1/2 inch flowers from a different color to layer on top of the larger flower. In fact you could use a different shape if that is your choosing.
Use your clear glue pen to put dots or lines on the flowers and heart. Sprinkle glitter onto the heart and flowers. Let dry for about 10 minutes.
In order to get straight fold lines, use the bone tool and ruler to make sure the small measure lines are lined up. Put the bag together with the Terrifically Tacky Tape, overlapping the tabs.
One the bag is put together, adhere the heart with the liquid glue pen and flowers with glue dots Or use an adhesive you have on hand.
This project was very simple and fun to put together. My kids are going to love their little bags with candy.
Remember think outside of the box and see what happens :)
Blessings,
Carol
Friday, January 28, 2011
Another Awesome Cartridge Deal!!
Yesterday Pam who is on Creating Keepsakes Community sent me the following site that has even better prices. You do have to pay shipping, but the prices are super awesome too. Always love to get the best deals I can and share the information. Just click here http://www.cricutmachine.com/
Hope you all will make the best of all the deals you can find on those Cricut Cartridges!!
Have a Happy Day :)
Blessings,
Carol
Hope you all will make the best of all the deals you can find on those Cricut Cartridges!!
Have a Happy Day :)
Blessings,
Carol
Wednesday, January 26, 2011
Awesome Deal!!
My fellow scrapbookers, crafters, cardmakers and more; Boy did I find an awesome deal today. Your asking where did Carol get this deal and what on earth did she get. Well, I purchased the following at Custom Crops, just click on the words and you will arrive at their site.
5 Cricut Cartridges listed below for the following prices. I ended up with free shipping. Yes, I called my husband first to get the "OK" to purchase. We both agreed the price was absolutely right. I only purchase my image cartridges when I can find them on sale, otherwise they are just too expensive. Never have I paid more than $26.00 for any of my cartridges.
Disney Tinkerbell & Friends $21.00
Give A Hoot $23.00
WinterWoodlands $20.00
Pooh & Friends $21.00
Freshly Picked $23.00
Honestly these prices are so hard to beat. WooHoo!! Saved Tons of Money!!!
Have a Happy Creative Day.
Blessings,
Carol
Friday, January 14, 2011
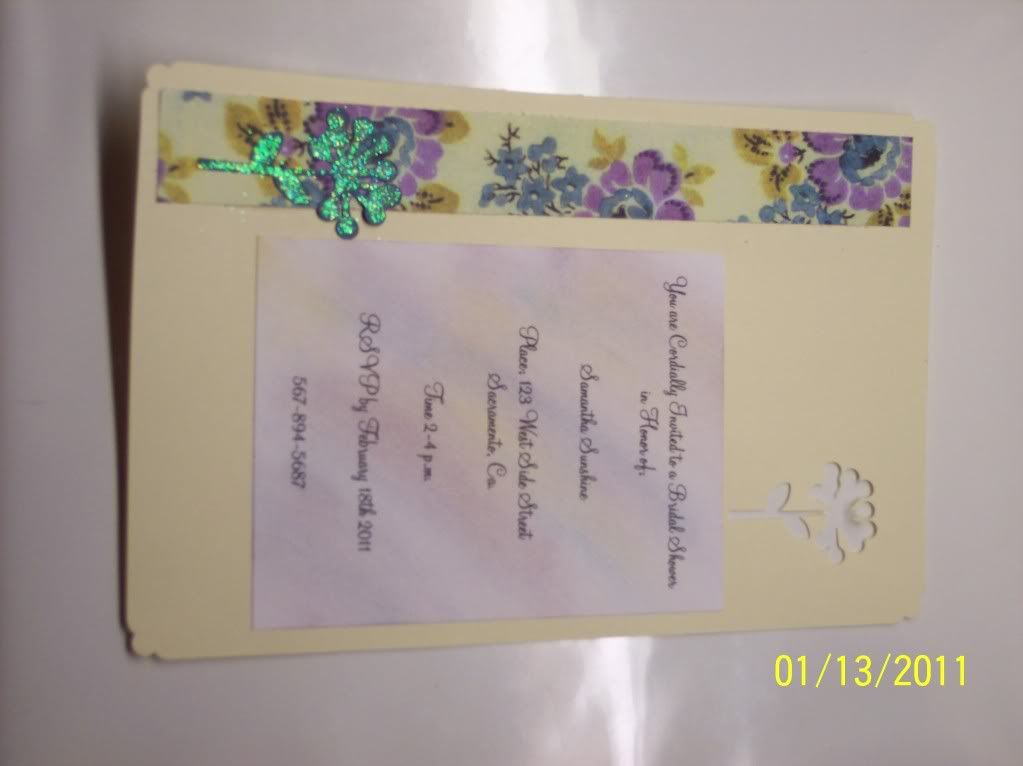
Bridal Shower Invitation
Well, it is now January and many people are thinking ahead for the weddings which are to come during the next 11 months. I remember planning our wedding months ahead. This idea I am posting today is for a beautiful Bridal Shower Invitation. Very quick and easy to make. Remember think outside of the box to expand this idea. You can make them in a variety of sizes, papers, embleshments, chalks. The possibilities are endless. When my daughter becomes a bride, we will create everything from our Cricut Expression Machine for her special day.
Items Needed;
Serenade Cartridge, Plant 1 3/4 inch
Your choice of Cardstock, 2 colors
Decorative Corner Rounder
Small Piece of Printed Paper
Clear Liquid Glue
Glitter of Your Choice
Chalks, Cotton Balls
Cricut Blade Settings; Speed and Pressure Med, Blade 5
What you want you want to do is cut a piece of light colored cardstock to 5 1/2 X 8 1/2. This is the base for the invitation. Cut an 8 inch long by 1 inch wide strip of printed paper. Alright, place the base of the invitation into the Cricut Cutting Machine, move the cutting blade to the place on the paper where you want the image to cut (when choosing the image make sure to press the landscape button, it makes the image cut vertically).
Cut the same image you choose on the second color of cardstock. Brush clear glue on the image and sprinkle with glitter. Let this dry for at least 30 minutes before placing on base invitation. Glue the printed paper strip onto the invitation.
On your computer type of the wording you would like to put on the invitation. Use a thicker piece of paper or just cardstock in a lighter color to print it on. Cut the paper of the wording down to 3.75 inches wide by 5 inches long. Use chalks with a cotton ball to lightly add color to the paper. Use colors that match the papers you are using.
Enjoy and have fun with this.
Blessings,
Carol
*This is an orginal creation
Subscribe to:
Comments (Atom)