May the Lord bless your Christmas. Remember Jesus is The Reason For The Season. Thank you for following my blog. I truly appreciate each and everyone who does. Enjoy the day with your family and friends.
Blessings,
Carol
John 3:16

Saturday, December 24, 2011
Friday, December 16, 2011
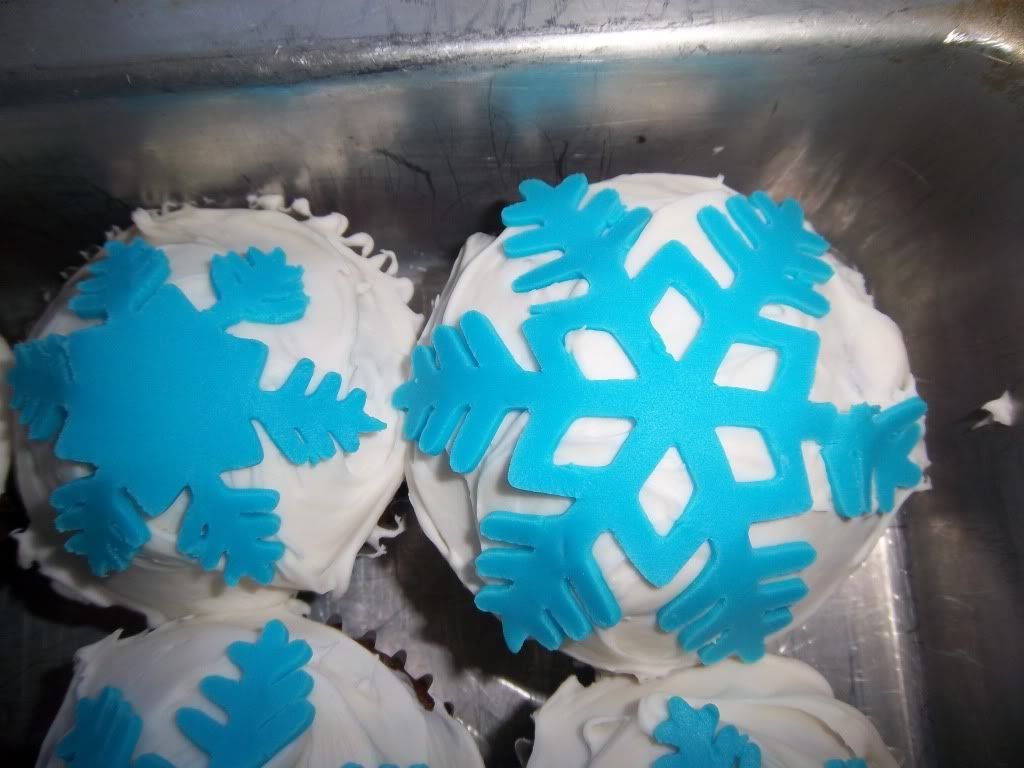
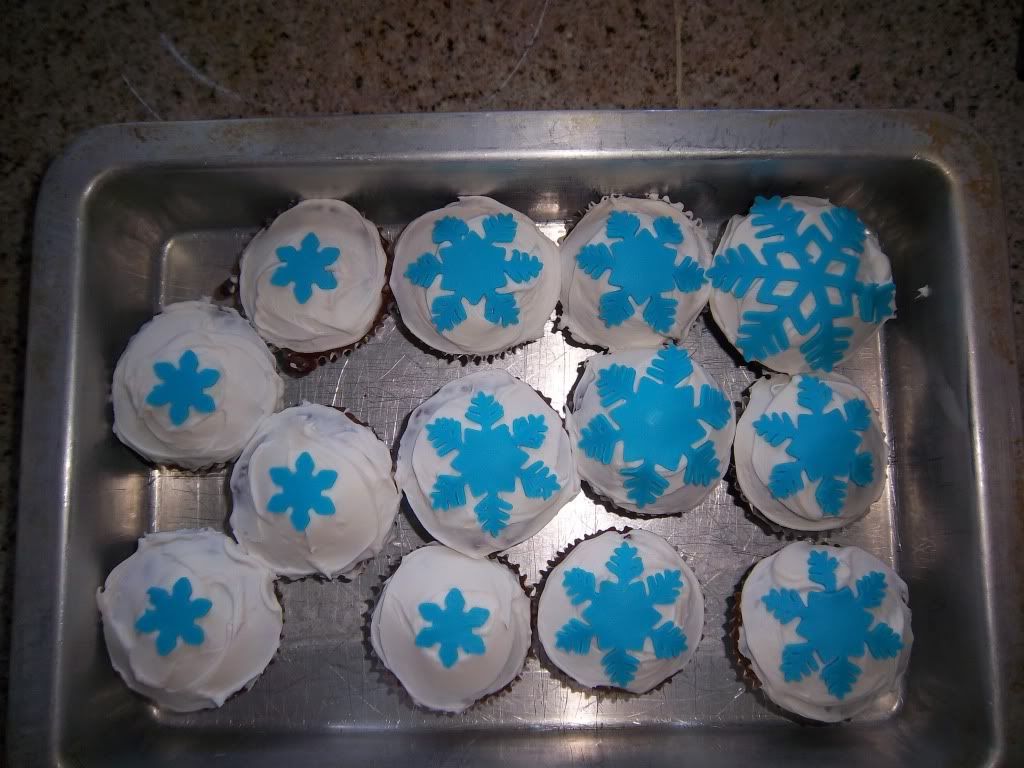
Birthday Snowflake Cupcakes
I made these the other day for my sons 9th birthday. These were cut with my brand new Cricut Cake Machine. Because I watched several videos on youtube, cutting out the fondant was a breeze. Placing a small chunk of the fondant in the microwave for 6 seconds make it super easy to knead. Just make sure when you roll your fondant out, do it very thin and then place on a flat surface in the freezer for at 30 min. This really helps it cut well. Also, my machine was only $49.95 plus shipping. We saved over $400.00!!! Looking forward to using it a whole lot more.
I entered this project over at My Sheri Crafts Blog, just click to go there.
I hope you enjoy this super fun project!!
Ingredients;
Cricut Cake Machine (Large One or Small One)
Cricut Cake Basics Cartridge
Cut 1in to 2 in snowflakes of your choice.
Fondant (I purchased the Wilton premade white fondant, then used my Wilton icing color to dye it) Knead the color into the fondant using latex gloves. This kept my hands from turning a pretty shade of blue.
Sunday, December 11, 2011
Christmas Stocking Stuffer Bags
Here is my newest video with a super fun project. I wanted to spice up my childrens stocking stuffer wrappers. Have fun with this. You could use many other cartridges in your collection.
Ingredients;
Winter Wonderland Cricut Cartridge
1 - Squirrel, Shift, Layers and Layers shift, Size 3 1/4 inch for all pieces.
Cut a 2 1/2 inch strip of printed paper, then measure what the width of the bag is.
Cut a 2 inch strip of solid cardstock, then measure what the width of the bag is.
Hole puncher or other punching tool for the two holes in the bag.
Decorative scissors for trimming the top of the bag with.
Monday, November 21, 2011
Happy Thanksgiving Everyone!!
I wanted to wish everyone a very Happy Thanksgiving. We are very busy in our household this week and next week. Our family is blessed to visit Disneyland Resort for 7 whole days starting next week. So projects will be posted December 5th. Keep an eye out for the videos I am filming this week. Tons of fun stuff ahead. Also, a huge "Thank You" for those who are new followers and those who have been following for quite some time. I appreciate you all so very much. May the Lord bless your Thanksgiving holiday.
Blessings,
Carol
Blessings,
Carol
Wednesday, November 16, 2011
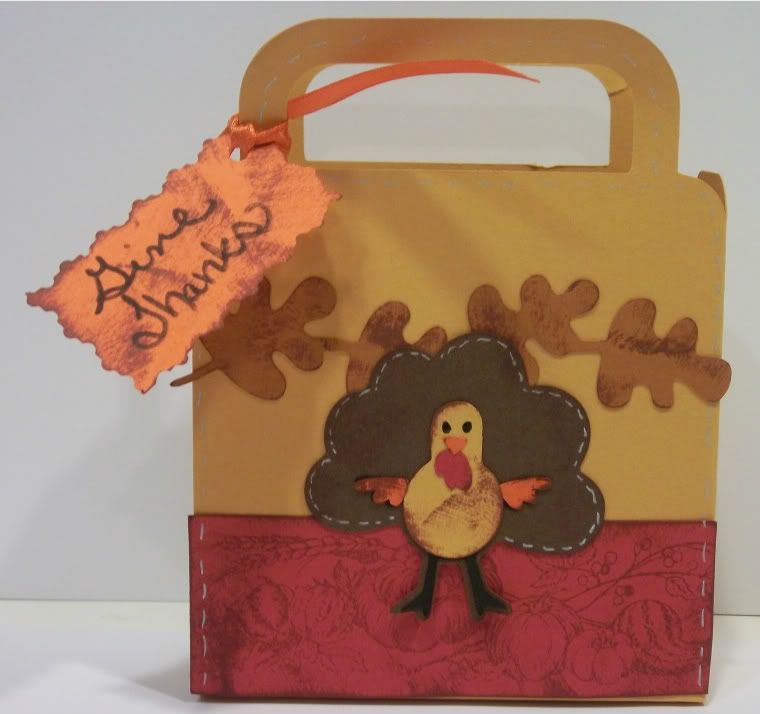
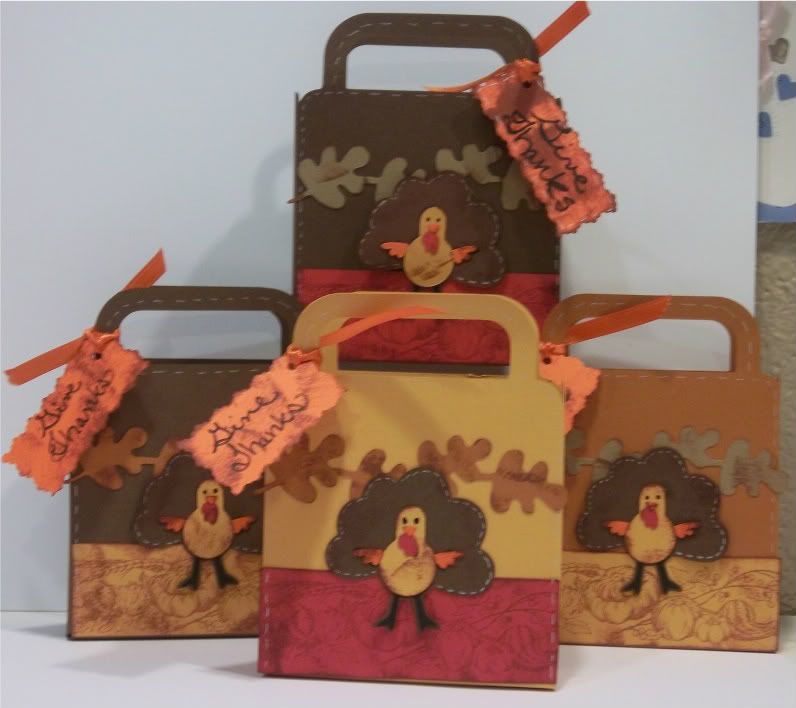
November Blog Hop Project Turkey Bags
Yesterday I choose to do a Blog Hop Project for Die Cut Divas, Fastabulous Cricut andMy Sheri Crafts. The project needed to be Thanks Giving Theme. I made some cute goodie bags for our family on Thanks Giving Day. We will fill the bags with some chocolates. My kids were so excited about them. My hope is that you will be inspired and enjoy them. The idea can be used for all the other holidays throughout the year, even birthdays or special occasions. Have fun with it.!!
Ingredients:
Plantin School Book Cricut Cartridge, Roly Poly Bag (6 in)
Simply Charmed Cricut Cartridge, Turkey 1 Shadow, Layer 1, Layer 2, Layer 3, (2in)
Give A Hoot Cricut Cartridge, Squirrel 1 Border (1in) for the leaves border
Cut a strip for bottom about 1 1/2 in and get it to fit on the wide part. Stamp it with a Fall themed stamp.
Cut small tag out of scrap cardstock (any size you like). I used decorative scissors. Make sure to distress the tag leaves, turkey and strip for bottom of bag with ink stamp pad. Any color will do.
Happy Creating!!
Blessings,
Carol
Monday, November 14, 2011
Simply Charmed Scrapbooking Page
Decided to enter my pages on a blog hop over at My Pink Stamper. Fun and easy Page. I used the Simply Charmed Cricut Cartridge. And of course my all time favorite Sparklie Paints. This project used several different mats. Using the paper out of my scraps for the mats. Sometimes simple is best.
Ingredients:
Simply Charmed Cricut Cartridge
Mushroom2 and Layer 2
Flower (any flower will do)
Sparklie Glue
Printed and Solid papers (Cardstock or Not)
Ingredients:
Simply Charmed Cricut Cartridge
Mushroom2 and Layer 2
Flower (any flower will do)
Sparklie Glue
Printed and Solid papers (Cardstock or Not)
Have fun with your pages
Blessings,
Carol
Words and More Page
When school is going on and activities are many during the month, projects tend to be a little behind. I hope you enjoy this one. Another Easter 12X12 page. Several months ago, my local Michaels store had some paper packs on sale. One of them has tons of sparklie paper. Just gotta love it. Using sparklie paper as a mat for words is fun. Makes the words "POP".
Have a Super Creative Day!!
Blessings,
Carol
Sunday, October 23, 2011
Fun Easter Page
This page was made with the Once Upon a Princess and Paisley Cartridge. Something a bit different . I choose to take on a look without the eggs and bunnies. Matting is a fun idea, this time I choose to only do one layer. My hope is that you enjoy it and try something a little different.
Have a super creative day!!
Blessings,
Carol
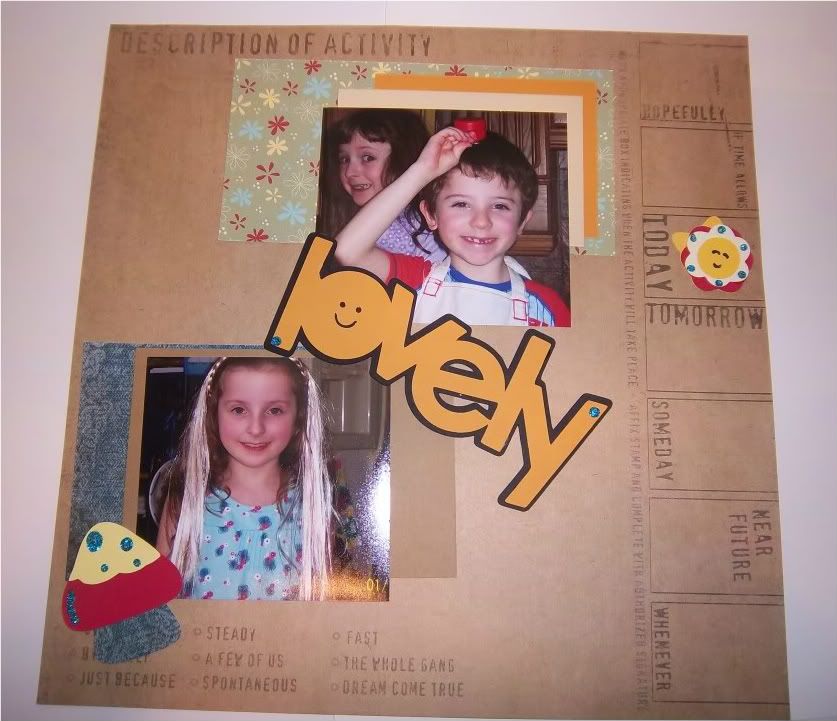
Monday, October 3, 2011
Nifty Fifties Cartridge
Good morning everyone!! Hope this new week is finding you all well. Last week we had a nice trip to Disneyland. The weather was beautiful and crowds were very low. Today's project is created using the Nifty Fifties Cricut Cartridge. Using all papers from Die Cuts With a View (this brand of paper works well on the Cricut Expression mats). I thought I would try more of a layering technique with my photos. Hope your inspired. Enjoy!!
Remember think outside of the box today.
Blessings,
Carol
Friday, September 23, 2011
Wild Week At Our Home
Needless to say our week has been eventful. My daughter has strep throat, I am not feeling well (seeing doctor tomorrow), and we are leaving Monday morning early for Anaheim California. Fun Fun Fun. Things will turn out and we all will be well again. Sometimes that just happens. When we get back the following week I will have some fun photos and ideas to share.
Have a wonderful weekend. Keep on Creating!!
Blessings,
Carol
Have a wonderful weekend. Keep on Creating!!
Blessings,
Carol
Thursday, September 15, 2011
Time to Read
This page was done with some really cute paper. A super nice lady named Josie gave me paper and other scrapbooking items from the companies she and her sister design for. Prima and Creative Imaginations. The papers and stickers are just wonderful. Enjoy!!

Have a Great Day!!
Blessings,
Carol
Tuesday, September 6, 2011
Second Week Of School
Here is very sunny California, we are working on our second week of school. Looking forward to a little vacation to Disneyland for two days and visiting my mom in the Bakersfield area too. Hoping you all are having a super lovely day.
Blessings,
Carol
Blessings,
Carol
Tuesday, August 30, 2011
Once Upon A Princess Cartridge Card
I love this cartridge from Cricut. There are so many neat images perfect for little girls and big girls alike. Sorry about the uncropped picture, you still get the card in good view. The doll clothes are a blast to mix and match on the little paper dollies. Enjoy!!

Happy Creating!!
Blessings,
Carol
Wednesday, August 24, 2011
Baby Gift Bag
This is the bag which I made to place all the cute baby items in for my friend. I already had the b (plus a few more), so no need to purchasing one. In my scrapbooking supplies, these types of bags are a true must have. Creating something unique, including the bag is fun. The image of the baby in the carriage is from the Cricut Cartridge Car Decal. Sorry, but my mind has left me and can't remember which cart I used for the words. My hope is that you all will start creating your own works of art on gift bags. Enjoy!!
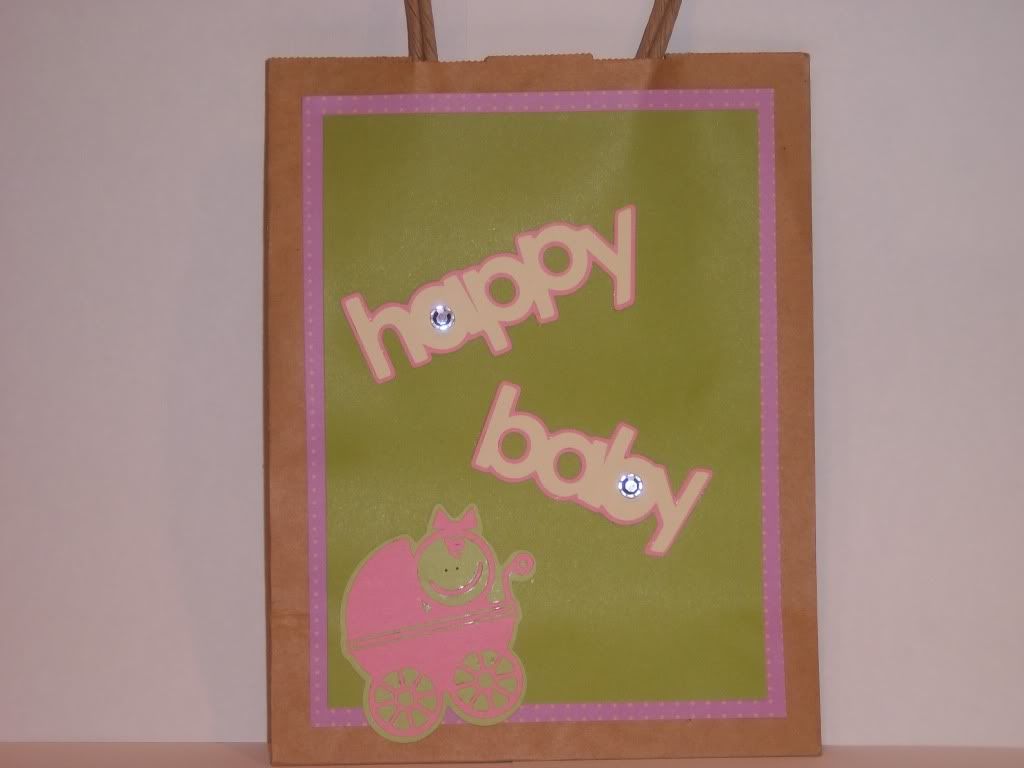
Think Outside of the Box!!
Blessings,
Carol
Saturday, August 20, 2011
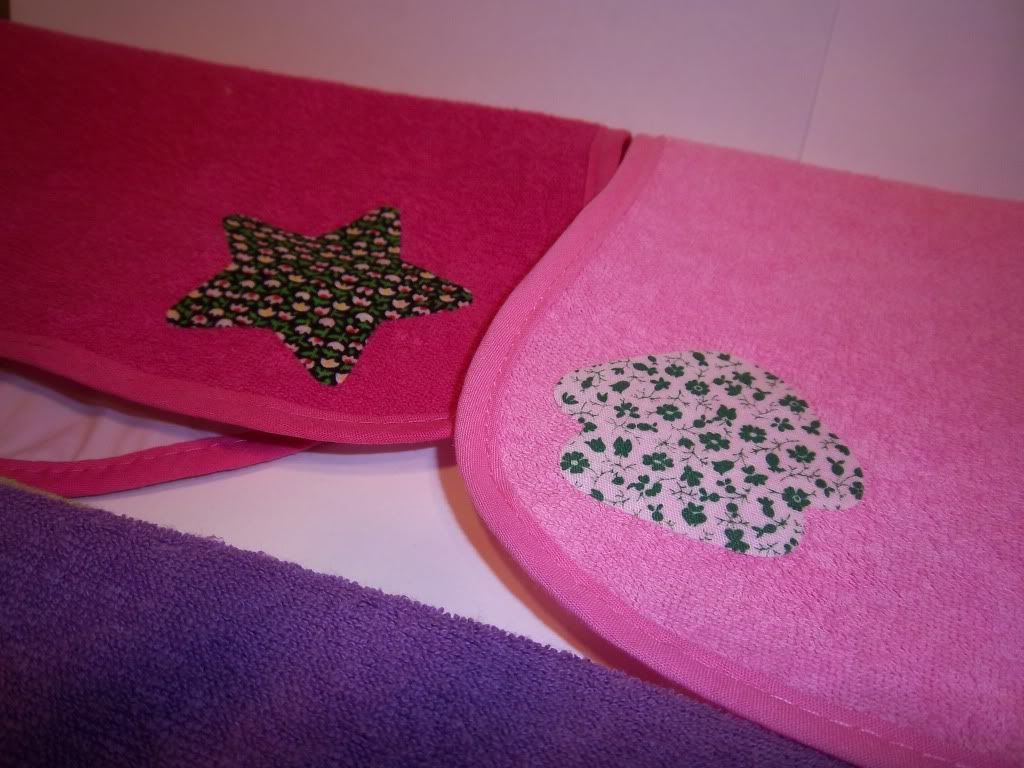
Cute Baby Bibs
A few weeks ago I decided to make some cute things for my friend who is having a baby girl very soon. I used several of my Cricut cartridges for the images. Using the iron on fabric fusing on the material and then cutting them out on my Cricut. Super easy. The fusing had a backing and I just peeled it off before cutting. My iron setting was on med, being careful not to keep in iron in one spot too long. The bibs have a plastic backing on them so I did not want them to melt. They turned out great!!
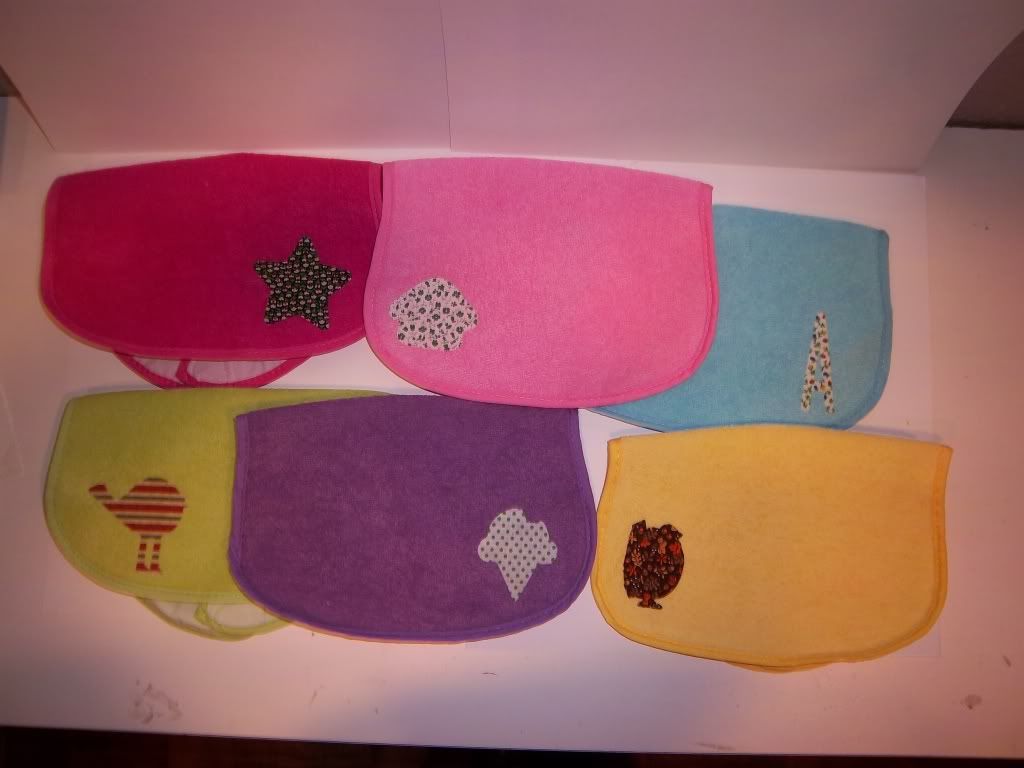
Have a Happy Creative Day!!
Blessings,
Carol
Friday, August 12, 2011
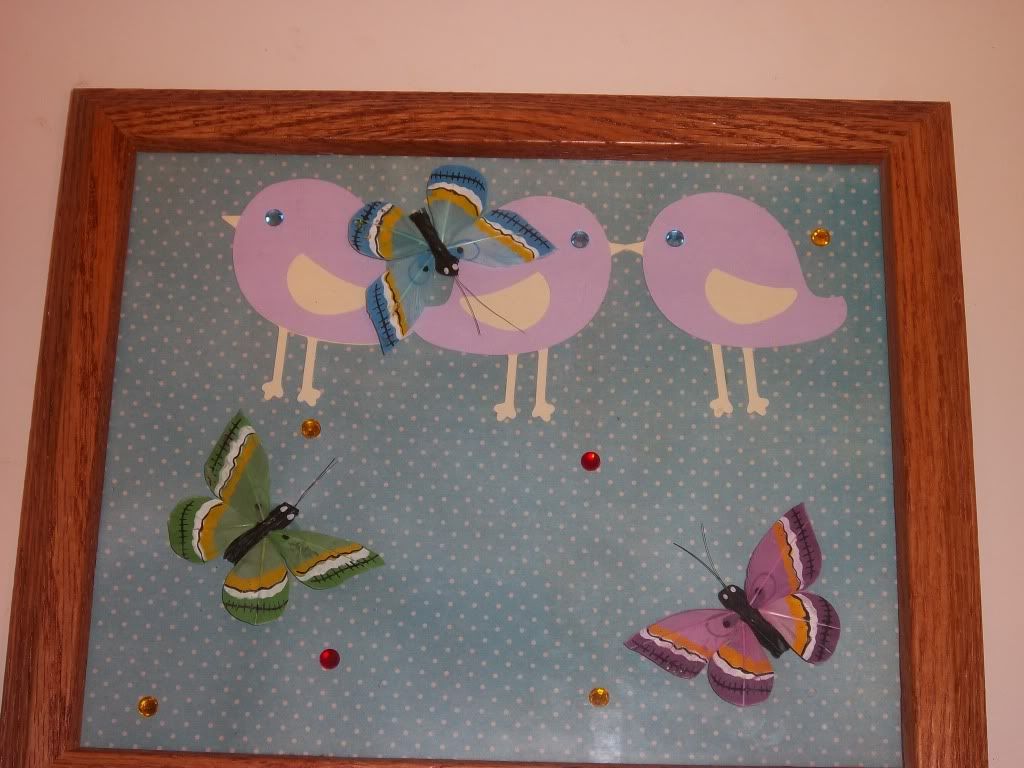
Pretty Butterfly Wall Frames
These are two of the three wall frames I made for my daughters room. In January we found 3 boxes of butterflies at our local thrift store. Daddy was getting ready to redo her room and she wanted something with butterflies in the room. Well, I recycled three picture frames and created these very pretty projects. Remember to use things around your home and create something completely different with them. I did and do all the time. Sure is alot of fun. Enjoy!!
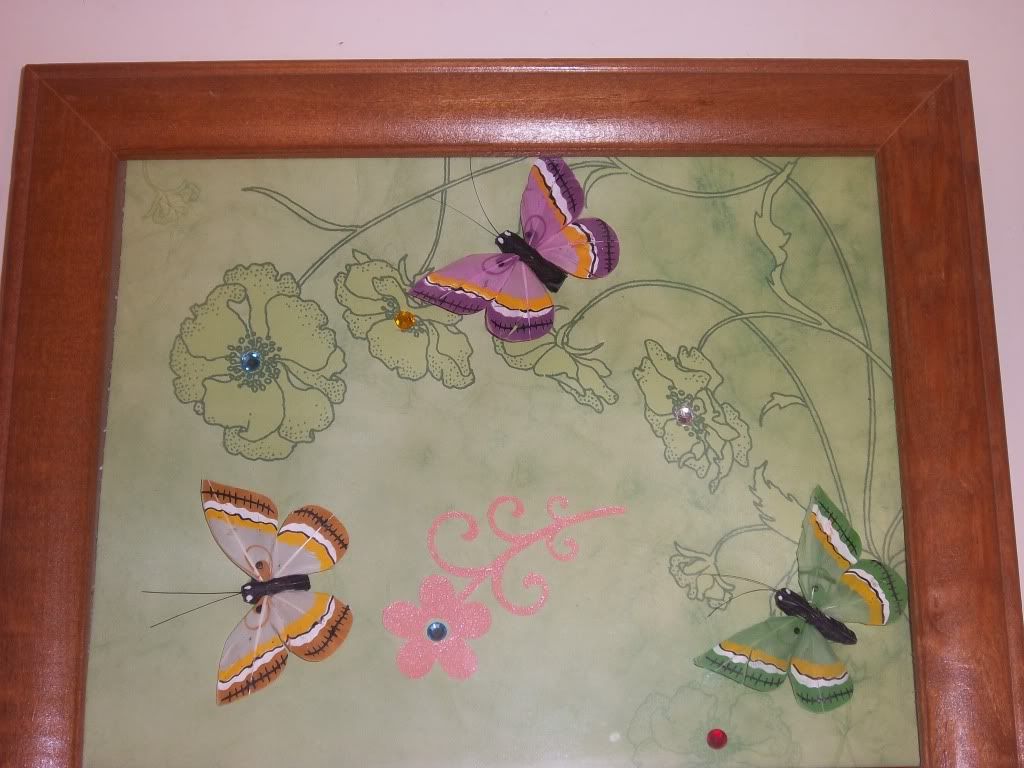
Happy Day To You!!
Blessings,
Carol
Tuesday, August 9, 2011
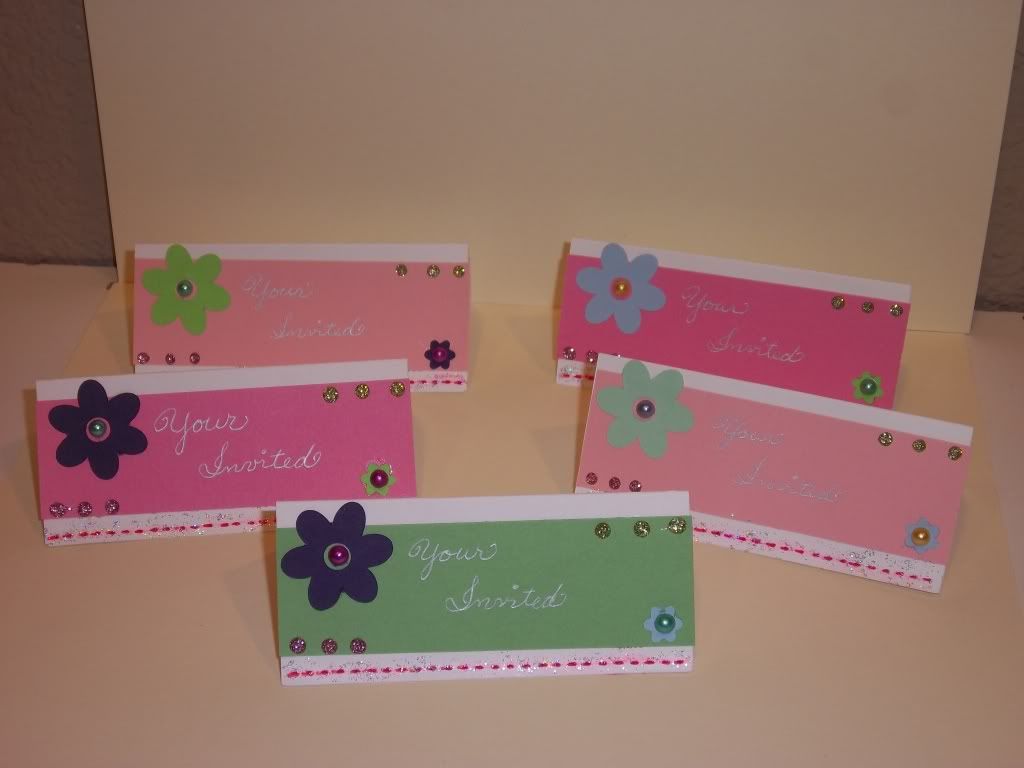
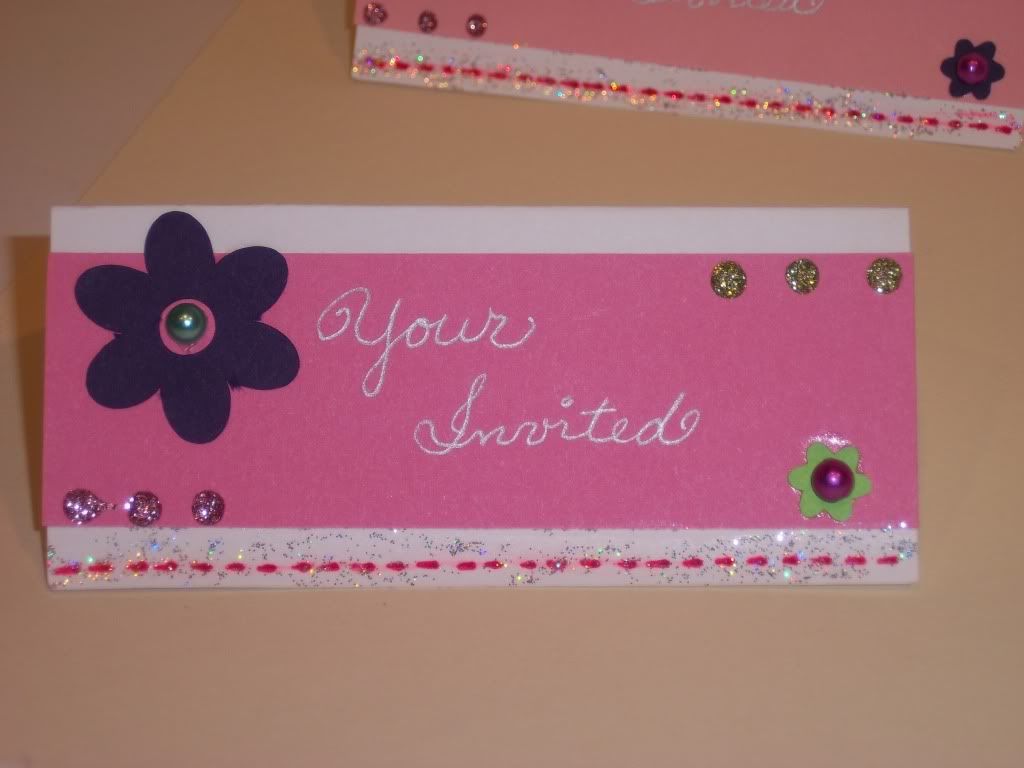
Pretty Cards for Blessings Tea Party
The other day while sitting in my scrapbooking room, an idea poped into my head for a super cute card. This type of card cannot be sent through the mail. You must hand it to the person. My daughter and I are going to host 5 different Blessings Tea Parties. The Cricut Cartridges used were Paisley, and Cuttin Up.
Friday, August 5, 2011
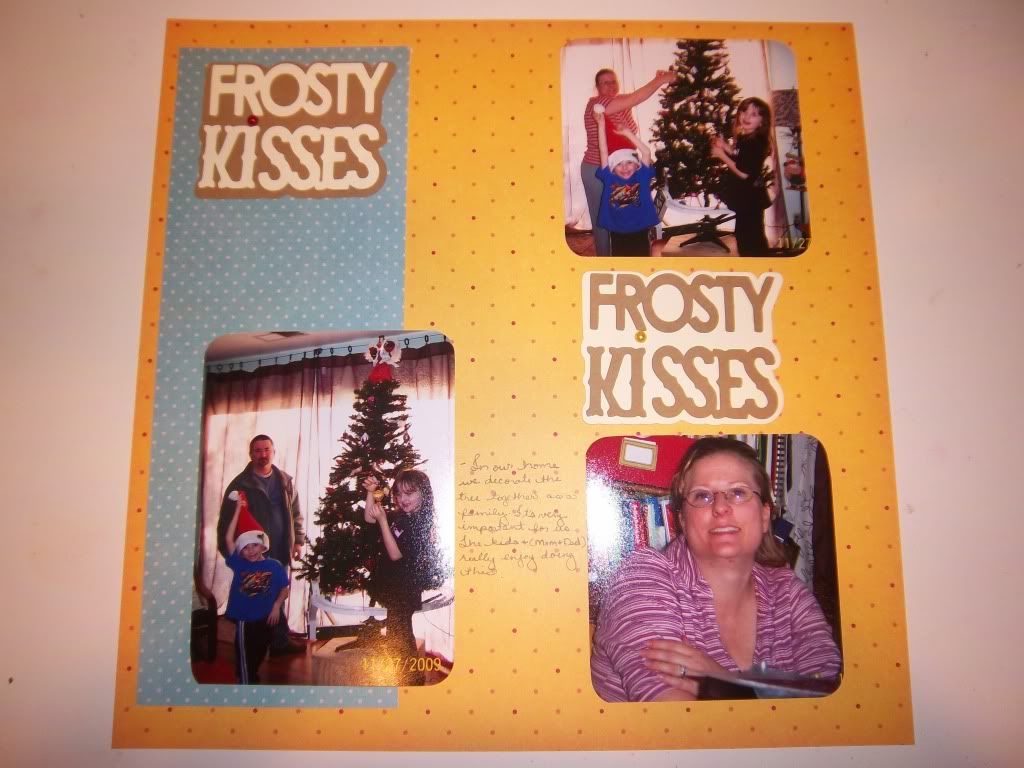
Frosty Family Kisses
Decorating the Christmas tree in our home is a family project. Something that we all love to do! The Frosty Kisses from Winter Woodland is absolutly cute. I just switched the paper for show opposite colors on the page.
Happy Creative Day To You!!
Blessings,
Carol
Tuesday, August 2, 2011
Joy 12X12 Page
Joy is such a somple word. The Winterwoodland has some perfect words for Christmas time pages or projects. The word joy is cut from some cute argoyle printed paper. The last 8 or 9 months I have been using the Designs With A View Papers. They cut really nicely on the Cricut Expression. Again, using untraditional colored papers for my pages. This switches up the look of the pages just a bit.

Think Outside Of The Box!!
Blessings,
Carol
Friday, July 29, 2011
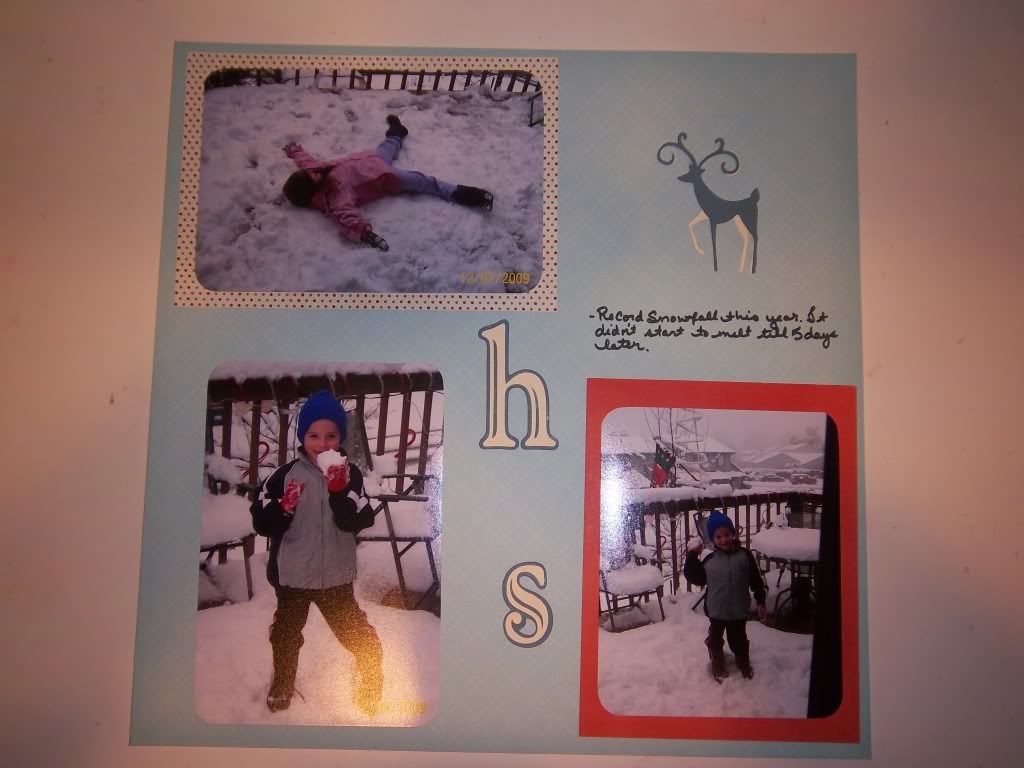
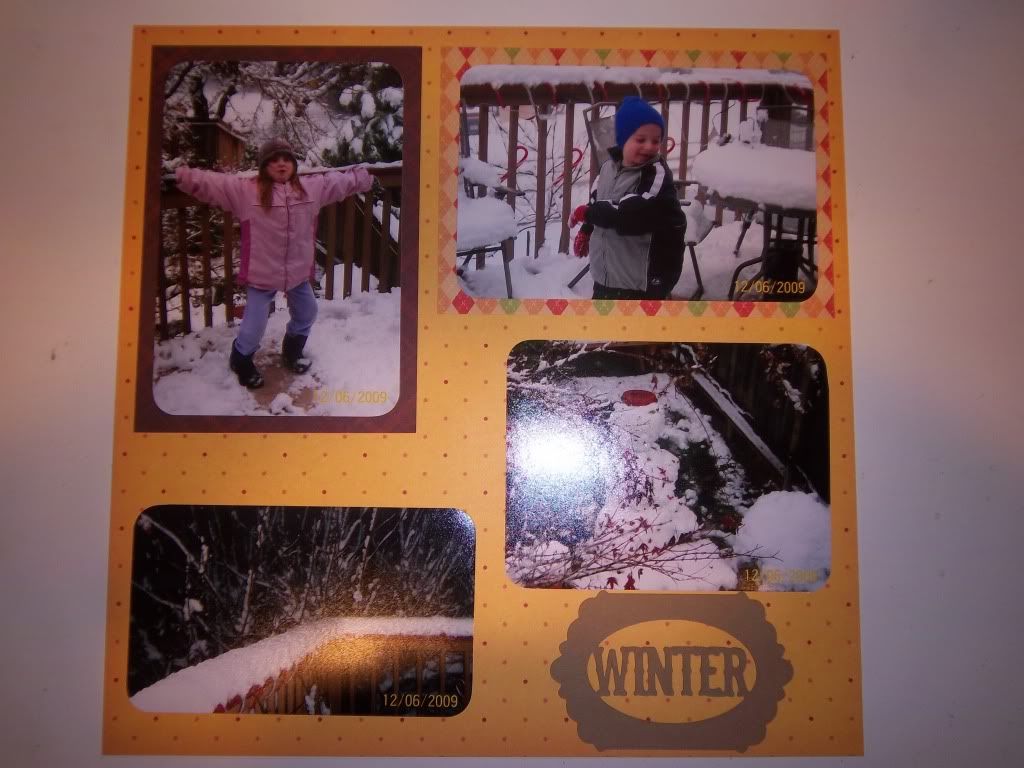
Snow, Snow and more Snow
Yes in California we at times get snow. In December 2009 we had a record year for snowfall. The white stuff stayed on the ground at our home for a whole week. Unbelievable!! My kids had a blast playing in it. We even made snow cones. I used the Winter Woodland Cartridge for the deer.
Happy Creative Day!!
Blessings,
Carol
Tuesday, July 26, 2011
Winter Woodland
Recently finished 2009 album. Yeah, I am catching up with my photos. Winter Woodland is such a neat Cricut Cartridge. This cartridge has some of the neatest images. As you can see my album pages are simple but fun. Instead of using the traditional red and greens, my paper is more in the Fall colors. The page turned out great. Tomorrow is my trip to Sams Club in order to download my photos and get them printed. We have photos from Fall 2010 till now to get done. Needless to say there are alot of photos.
Have a super day and Thanks for stopping by.
Blessings,
Carol
Monday, July 4, 2011
Happy Independence Day
Let us not forget the great sacrifices which were made for our Freedoms. Keep God in our country. May the Lord lift us up this day. Happy 4th of July.
Blessings,
Carol
Blessings,
Carol
Thursday, June 23, 2011
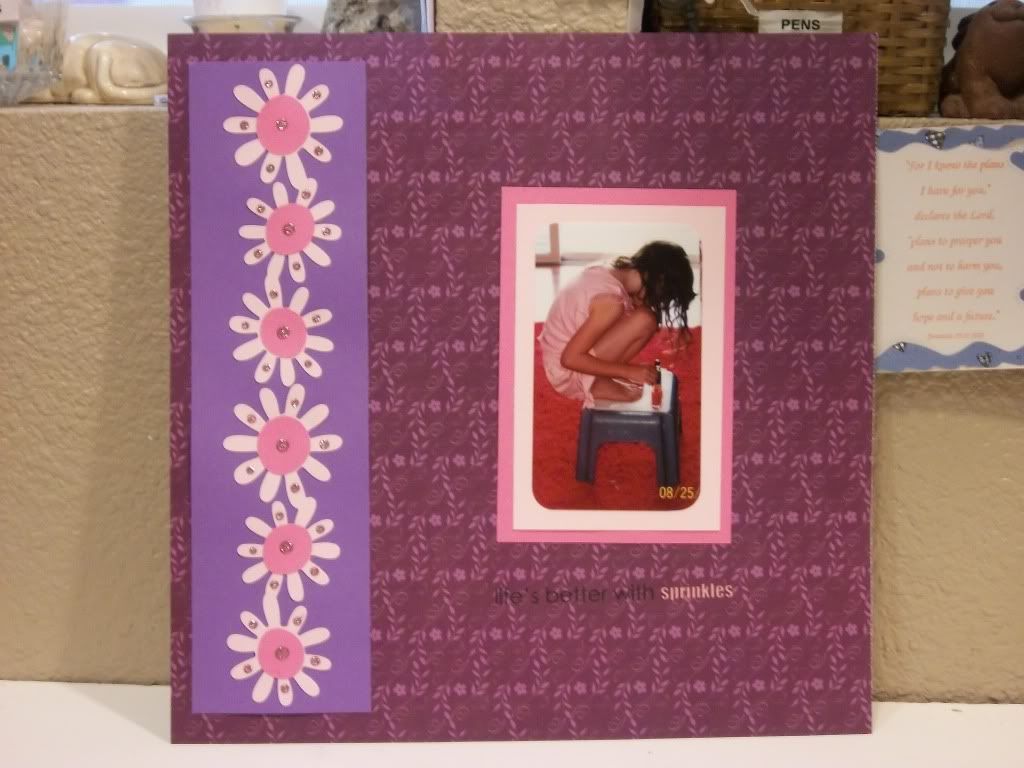
Balancing Act
This cute little girl (my daughter) decided to paint her toenails. It was the way she painted them that had me laughing up a storm. She has very good balance as you can see. This 12 X 12 page was very simple to create. I just used the Doodle Charms Cartridge. Cutting 2 - 2in Flower 1 Border and shift. I used glitter glue for the accents on the flowers and added a rub on saying to the main page.
Enjoy and Think Outside of the box.
Blessings,
Carol
Tuesday, June 7, 2011
12 X 12 Page Cricut Cartridge Freshly Picked
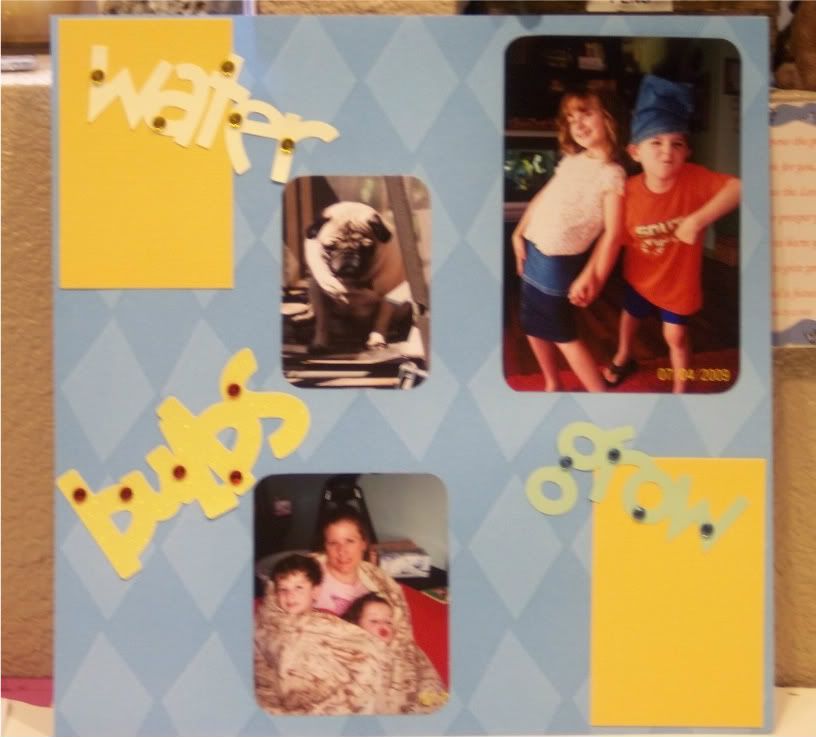
Good morning everyone!! Hope your weekend was great. Today we have some sunshine here in Northern California. We are hoping the sunshine stays for good. I am sorry the photo of my page is a bit fuzzy. You can still get the idea of the layout.
Cut 1 - 2 in Flower 7 words (bulb), 1 - 2 in Rake 2 words (grow), 1 - 2 in water can words (water). Cut 2 3 X 4.5 in rectangular mats. Use glitter gems on the words.
Another simple but fun page. Enjoy!!
Cut 1 - 2 in Flower 7 words (bulb), 1 - 2 in Rake 2 words (grow), 1 - 2 in water can words (water). Cut 2 3 X 4.5 in rectangular mats. Use glitter gems on the words.
Another simple but fun page. Enjoy!!
Blessings,
Carol
Tuesday, May 31, 2011
12 X 12 Page Using Pooh and Friends Cricut Cartridge
Well it is Tuesday here in overcast Northern California. Wishing for some sunshine so our garden will just start growing well. Today's project is from a couple of years ago. I am two years behind in my albums, catching up currently. Anyways, I thought I would use my Pooh and Friends Cricut Cartridge. There are alot of cute garden type images perfect for the photos which are used.
Just cut 1 - 3 in Rabbit, 1 - 3 1/4 in Icon Rabbit Shift and Icon Rabbit for basket and apple. Cut 1 2 3/4 in Tigger Icon and Icon Shift for Vegetable Parts.
Super easy, cute and fun. Use your imagination and see what you will come up with. Hope your day is a happy one.

Just cut 1 - 3 in Rabbit, 1 - 3 1/4 in Icon Rabbit Shift and Icon Rabbit for basket and apple. Cut 1 2 3/4 in Tigger Icon and Icon Shift for Vegetable Parts.
Super easy, cute and fun. Use your imagination and see what you will come up with. Hope your day is a happy one.
Blessings,
Carol
Friday, May 27, 2011
Blog Award!! Thank you
A few weeks back I received a wonderful new Blog Award called; Cricut - Tastic Award from Love That Bug blog. Just click on her blog name and you will just love the wonderful projects Stacy posts on her blog.
Just right click on the Blog Award Picture then copy it.

Now onto the rules: Your blog has been deemed Cricut'Tastic. Wear this badge proudly on your blog and share it with friends. Share this award with 10 people that you think have Cricut'Tastic Blogs. You also have to tell 5 cricut related things about yourself.
My Five Things Are;
1. I love to scrapbook and just be plain creative.
2. I am a homeschooling mom with 2 children, 2 more hopefully to arrive by the end of Summer.
3. My husband and I will be celebrating our 23rd wedding anniversary in less than two weeks.
4. Blogging is a blast!!
5. We truly enjoy visiting Disneyland as a family.
Now for the 10 creative blogs:
Tracy http://trace-elementz.blogspot.com/
Yolie http://www.justyolie.com/
Andi http://faithtrustandpatternedpaper.blogspot.com/
Shauna http://crafteeshe.blogspot.com/
Amber http://my3escrapbooking.blogspot.com/
Patty http://creativediva98.blogspot.com/
Ashley http://cricut-crazed-lady.blogspot.com/
Sheri http://myshericrafts.blogspot.com/
Renae http://memoriesbyrenaeb.blogspot.com/
Tina http://ollieanddextersmommy.blogspot.com/
Just right click on the Blog Award Picture then copy it.
Now onto the rules: Your blog has been deemed Cricut'Tastic. Wear this badge proudly on your blog and share it with friends. Share this award with 10 people that you think have Cricut'Tastic Blogs. You also have to tell 5 cricut related things about yourself.
My Five Things Are;
1. I love to scrapbook and just be plain creative.
2. I am a homeschooling mom with 2 children, 2 more hopefully to arrive by the end of Summer.
3. My husband and I will be celebrating our 23rd wedding anniversary in less than two weeks.
4. Blogging is a blast!!
5. We truly enjoy visiting Disneyland as a family.
Now for the 10 creative blogs:
Tracy http://trace-elementz.blogspot.com/
Yolie http://www.justyolie.com/
Andi http://faithtrustandpatternedpaper.blogspot.com/
Shauna http://crafteeshe.blogspot.com/
Amber http://my3escrapbooking.blogspot.com/
Patty http://creativediva98.blogspot.com/
Ashley http://cricut-crazed-lady.blogspot.com/
Sheri http://myshericrafts.blogspot.com/
Renae http://memoriesbyrenaeb.blogspot.com/
Tina http://ollieanddextersmommy.blogspot.com/
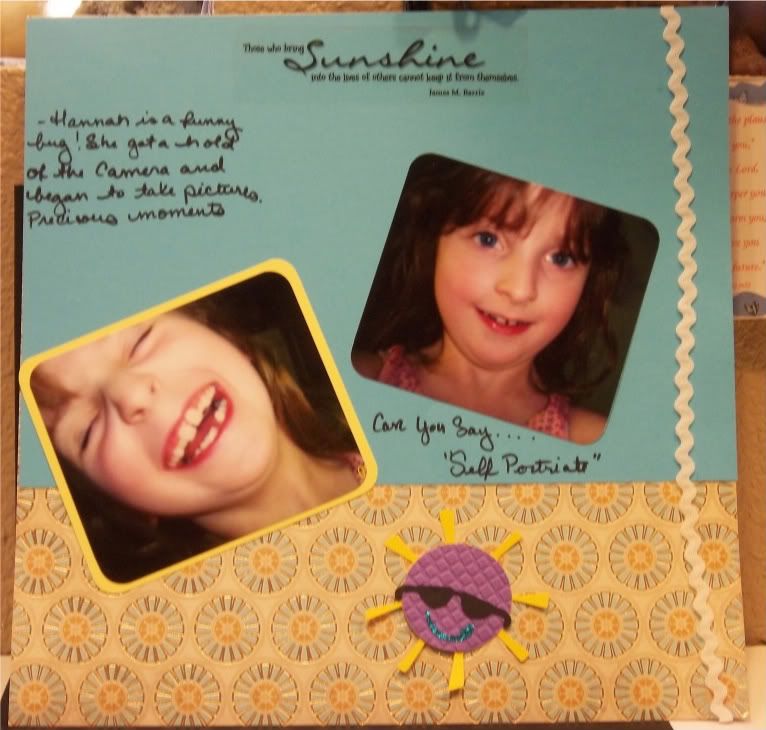
Self Portrait Using simply Charmed Cricut Cartridge
Good afternoon everyone. I apologize for not posting any projects in a while. Next week my husband and I will be officially certified Foster Parents, and working on the adoption part now. We are so excited!! God has many wonderful things for us as a family. Looking foward to more precious children in our home.
Alright the projects are comming. School is out now and there is more time for fun stuff. I hope you enjoy my projects.
This 12 X 12 scrapbook page is created using the Simply Charmed Cartridge. Cut 1 - 3 in Sun 1, layer. I embossed the circle of the sun and used glitter glue for the the smile. Loved the glasses, they are super cute.
My daughter decided to take a self portrait. When I was downloading the photos all I could do was laugh. Those special moments is the life of our family. Enjoy this project and remember to think out of box. Be creative!!
Blessings,
Carol
Tuesday, May 3, 2011
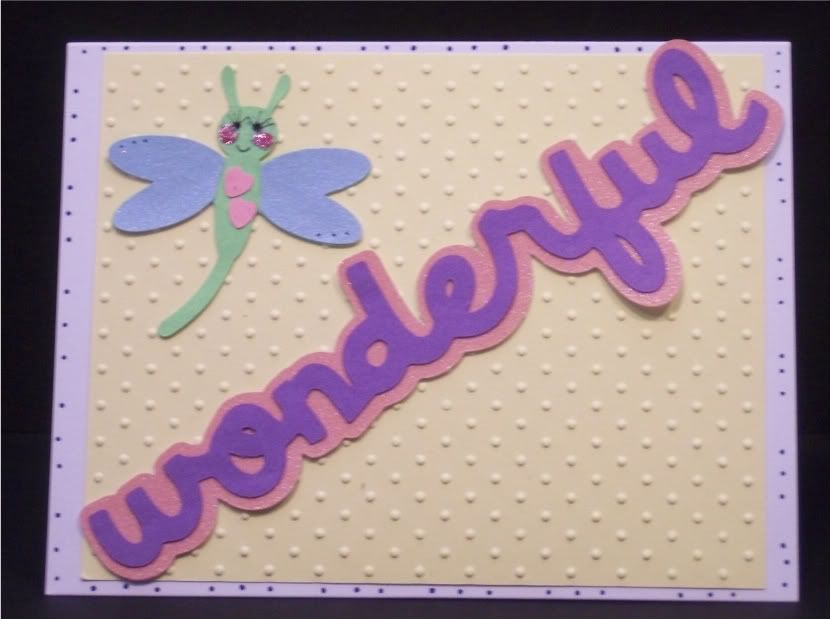
Pretty Dragonfly Wedding Card
This is a bit late in the posting. But, you know better late than never. Last week we had alot of appointments to take care of for our foster to adoption process. We are almost done with our certification for the fostercare part. Keep praying for us please. We appreciate them so very much.
Cute card for our friends daughter who recently married. This time I used the Paisley Cricut Cartridge. There are alot of super fun images on this cartridge. Again, I must say my Cricut Expression Machine was the best gift my husband ever gave me. I am able to do so many fun and creative projects with it.
Supplies Needed;
Paisley Cricut Cartridge
Sparkly and Plain Cardstock
Sparklie Glue
Instructions;
Cut 1- 2 in Dragonfly, Shift, layer1 Shift. This gives you all the parts of the dragonfly. Cut 1- 1/2 in Mushroom 3 Word, Word Shadow Shift. This cuts out the word "Wonderful" and the shadow for the word.
Premade card 4.25 H 5 1/2 W. I have a package of premade cards that I used now and then.
Cut a piece of cardstock for a mat that is just a little smaller than the card. Emboss the mat.
Assemble all the pieces and place on the card as shown in the photo. Just add little eyes and mouth. Use the glitter glue for the little cheeks. With a pen add details around the edge of the card.
Cute and easy card. The dragonfly image is a really fun one. Remember think outside of the box when creating. You never know what will appear in your creations.
Enjoy,
Carol
Monday, April 25, 2011
Project for tomorrow
Good Monday to you all. My hope is that yesterday Easter Sunday was a wonderful one with your families. Just wanted to let you know the projects are coming tomorrow. Lots of fun scrapbooking pages to post. Still doing catch up with my albums. I bet there are many of you out there that have some catching up to do to. Thanks for stopping by and have a fun Creative day!!
Blessings,
Carol
Blessings,
Carol
Sunday, April 17, 2011
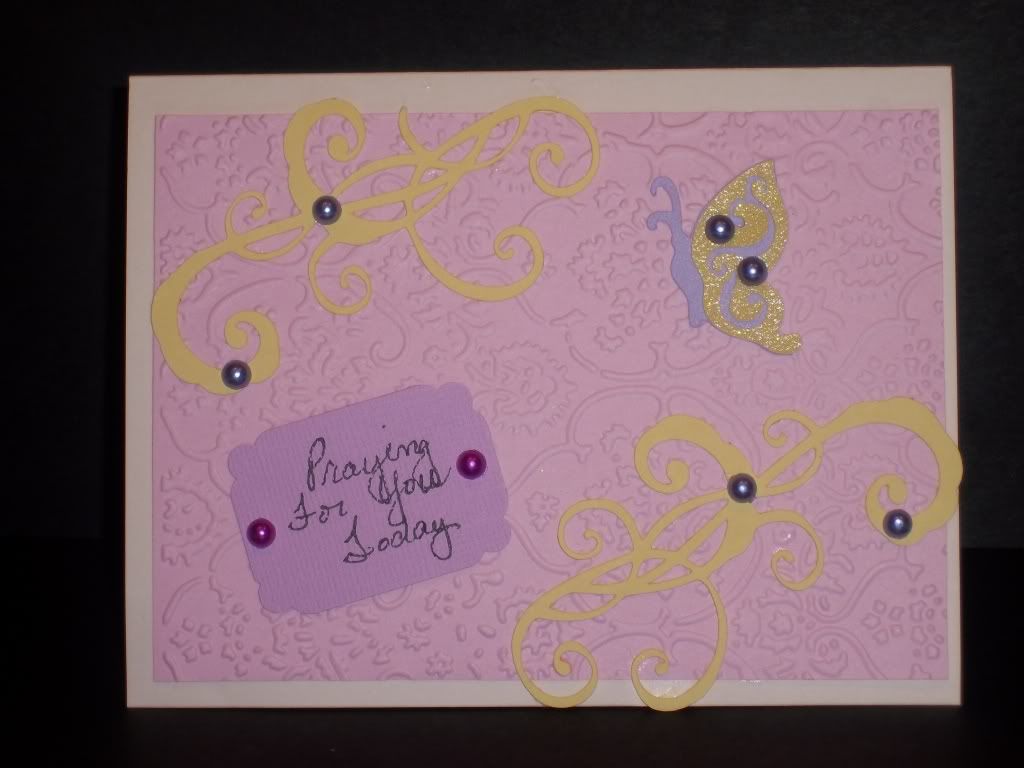
Well this project is a day late. Sorry about that. This card was made for my mom a few weeks back. I must tell you all again how much my Sizzix Texture Boutique is the best. Embossing my projects really adds that extra fun. I used the Cricut Cartridge Straight From The Nest. Enjoy.
Supplies Needed;
Cricut Cutting Machine
Cricut Cartridge Straight From The Nest
Sparklie and Solid Cardstock
Glitter Pearls
Sizzix Texture Boutique or Cuttle Bug
Instructions;
Cut 1- 1 3/4 in Border Flouish 1 and 1 1 1/4 in Butterfly 1 and shift, (use multi cut for the sparklie paper on the wings). Make sure to cut the flourish in half, use half for each corner of the card.
Cut a mat for card and emboss it with whichever template you would like, adhere to card, add assembled images and accents. Just cut a small mat for writing words on, use decorative corner rounder for the edges.
Super easy and fun to make.
Have a Great Creative Day Everyone!!
Blessings,
Carol
Friday, April 15, 2011
Hello Friday, Hope Yours is Well.
Good morning everyone. For sure tomorrow I will have a fun project to post. We just arrived home Wednesday evening from being at Disneyland California. The trip was fun!! Unpacking and doing laundry not so fun, oh well. Just wanted to say a big "Thank You" to those who are following my blog. I appreciate you all so very very much. My hope is that this happy place will inspire others to think outside of the box when creating.
Blessings,
Carol
Blessings,
Carol
Monday, April 11, 2011
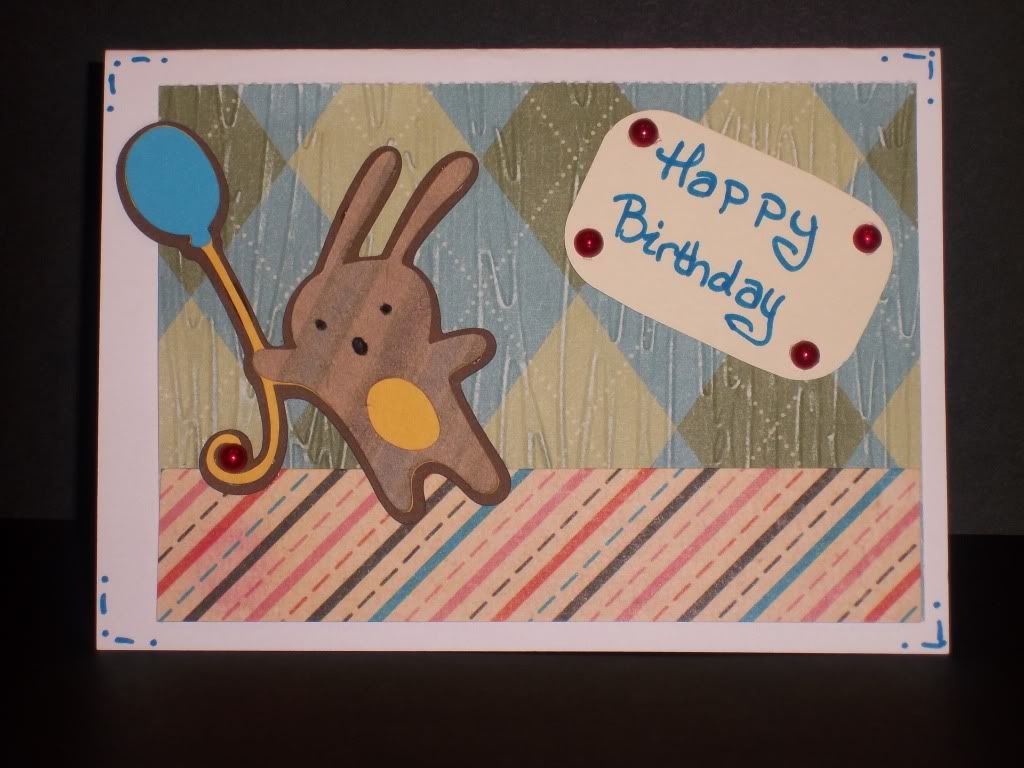
Bunny Birthday Card Using Give a Hoot Cricut Cartridge
I may be on a trip but made sure there was a project for you all to enjoy. This card turned out really cute. It is a birthday card for my son's friend from Boy Scouts. The Give a Hoot Cartridge has a large choice of images. Been having fun exploring this one.
Supplies Needed;
Cricut Cutting Machine
Cricut Cartridge Give a Hoot
Solid and Printed Cardstock
Embossing Machine
Glitter Pearls
Instructions;
Cut 1- 3 in Rabbit 2, Shadow, Layer and Layer Shift
Cut a mat a little smaller than your card
Cut 2 in mat strip for bottom
Cut a small piece to write Happy Birthday on.
This card was very simple and fun to make. Think outside of the box and have fun with it.
Have a super day!!
Blessings,
Carol
Friday, April 8, 2011
Spring Card Using Staright From The Nest Cricut Cartridge
Well, it has been far too long for a project. My family and I have had several personal things to attend to and getting ready for our Birthday Disneyland Trip this weekend. This card has a Spring theme. Enjoy!!
Supplies Needed;
Cricut Cutting Machine
Cricut Cartridge Straight From The Nest
Solid and Printed Cardstock
Glitter Glue
Glitter Gems
Instructions;
Cut 1- 3 in Tree 1, Shift. Cut 1 - 1 3/4 in Filgree2 Border Shift.
Cut a mat less than 5.5 in wide X 4 in high. Make sure to emboss this
Cu a piece of ribbon and stick to back side of the mat. I used photo tabs.
Now put the image of the tree together, and spread sparkle glitter all over the scroll. Using an embossing gun on the scroll to dry it quickly. Works really well.
Place all glitter gems on the card and images.
Cut a small mat for writing the words on. Use a decorative corner punch on all four corners.
Don't forget to think outside of the box. Get creative everyone!!
Blessings,
Carol
Friday, April 1, 2011
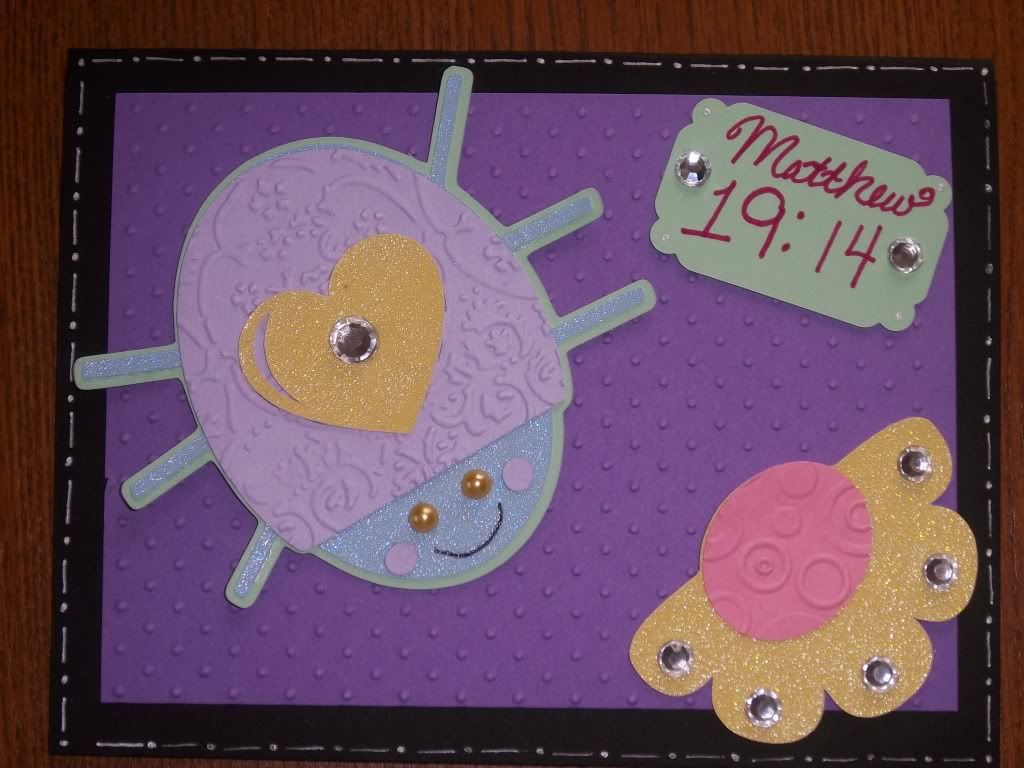
Lady Bug Baby Shower Card
Good Friday to you all!! We are still soaking up the beautiful weather here in Northern Califoria. Todays project is a super cute one. I went all out with sparklie paper, gems and embossing. The two Cricut Cartridges used are the Simply Charmed and Paisley. Enjoy!!
Supplies Needed;
Cricut Cutting Machine
Cricut Cartridges; Simply Charmed and Paisley
Sparklie Paper and Solid Cardstock
Gems, Silver Gel Pen
Sizzix Texture Boutique or Cuttlebug Machine
Instructions;
Cut 1- 3 1/4 in Love Bug 1, Shadow, Layer 2, Layer 3 from Paisley Cartridge. Cut 1- 1 3/4 in Dog 1, button and shift for flowers from Paisley Cartridge. Make sure when cutting out the images on the sparklie paper to to Multi Cut two times.
The mat is 5 1/2 in by 4 inches.
Emboss the regular cardstock pieces including the purple mat as seen in the photo. The shadow on the lady bug was not embossed. I did not emboss the sparklies paper pieces.
For the little name plate I just used a small scrap and cut it to 1 in by 1 1/2 in.
Now add all the fun gems and accents with the pen.
Loved this project.
Remember to think outside of the box when creating. Happy Day to you all!!
Blessings,
Carol
Wednesday, March 30, 2011
A Few Thoughts For The Day
Hi everyone!! Hope your have a super day. Here in Northern California, we have had some sunny days yesterday and today. Wahoo!! My poor children were so ready to play outside, (Me Too). Tomorrow I will have a fun project to post. Have a Super Creative Day!!
Blessings,
Carol
Blessings,
Carol
Sunday, March 27, 2011
Easter Egg 12 X 12 Page
Good Sunday to you all! Here in Northern California we actually have partially clear skies. Yeah!! There has been so much rain the last week, I thought we were going to have to build an ark like Noah did. So, today I though I would post a cute and very simple page for Easter. The cartridge is the Cricut From the Nest. Have fun with it.!!
Supplies Needed;
Cricut Cutting Machine
Cricut Cartridge; From The Nest
Solid and Printed Cardstock
Sayings Stamps
Black Marker
Instructions;
Cut 1- 5 in Nest (Layer, Shadow Shift), 1- 5 in Nest, 1- 5 in Nest (Shift)
Start with a solid piece of 12 X 12 cardstock, then with the printed cardstock, cut 1 in off 2 sides. Use a decorative corner rounder on the corners. I have one from Creating Memories (had it for years).
After all pieces are cut out just assemble them and place on the scrapbooking page. Using any type of saying stamps, stamp on the printed page. Add accents to to the eggs and nest.
There you have a nice Springy Easter page.
Remember think outside of the box.
Blessings,
Carol
Friday, March 25, 2011
Easter Goodie Bag Video
I just downloaded this onto youtube. Still need to work out some things with video taping. For some reason the microphone makes me have a lisp. Videos will be tweaked as I continue. Also I have a link to my youtube channel. On my youtube tab on my blog also contains a link to my channel. Thanks everyone. Appreciate each of you who follow my blog.
http://www.youtube.com/user/3KidCropShop
Blessings,
Carol
http://www.youtube.com/user/3KidCropShop
Blessings,
Carol
Wednesday, March 23, 2011
Look for my Video in a few days.
Hi everyone, I just wanted to let you know that I am working on a video for my blog. This one is fun and I have already posted the project. Just keep your eyes open and it will be posted. Thanks again to all who are following my blog, you are all appreciated.
Blessings,
Carol
Blessings,
Carol
Sunday, March 20, 2011
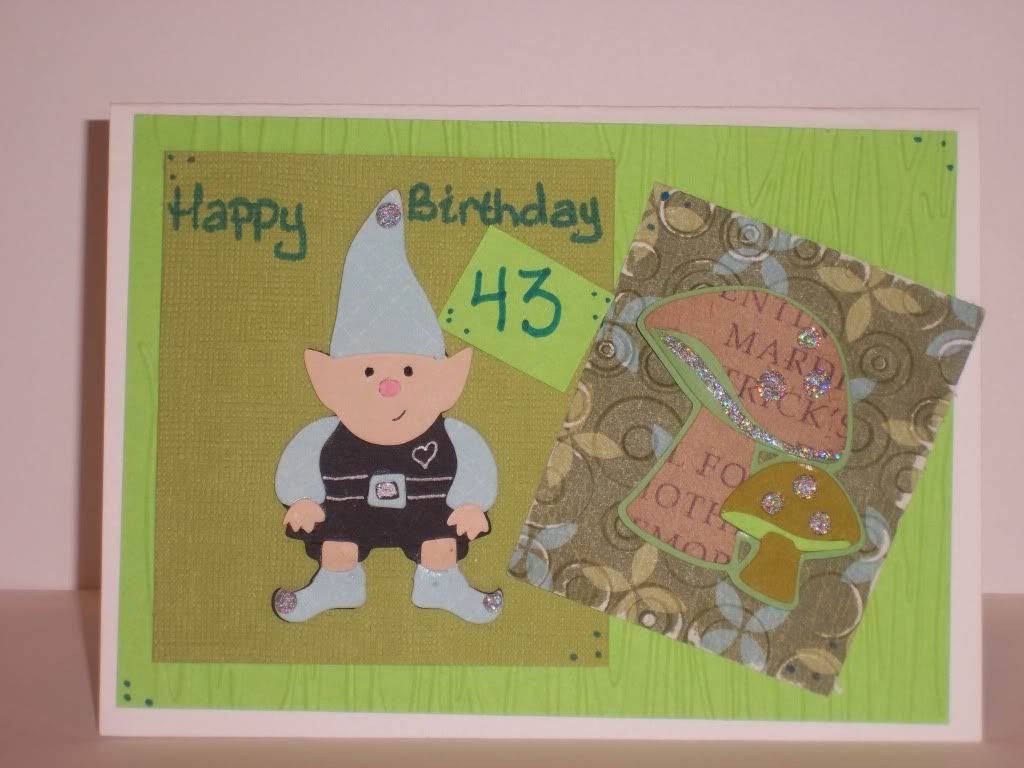
Have a Very Gnomie Birthday Card Using Cricut Cartridge; "Freshly Picked"
The other day I decided that it was about time to use the Gnome image in the Freshly Picked Cricut Cartridge. This card is for my husbands birthday in a few weeks. Thought is would be fun since he is my little Gnome man. Enjoy this quirky little birthday card.
Supplies Needed;
Cricut Cutting Machine
Cricut Cartridge; Freshly Picked
Solid and Printed Cardstock
Glitter Glue
Embossing Machine or Sizzix Embossing Boutique
Sand Paper Square
Silver Gel Pen
Instructions;
Cut 1- 2 3/4 in Gnome 1 (shift), and (layers shift). Cut 1- 1 3/4 in Mushroom all the parts except the dots.
Make a mat for the card (mine is green), emboss it. Cut another mat that fits just right for the gnome. Cut a 3 X 3 in mat for the mushrooms from printed cardstock, emboss it then run the sand paper over it lightly.
Put the images together and add accents to the gnome and mushrooms. Use the silver gel pen on the gnome. Add accents on the rest of the card. Write Happy birthday on the tiny mat ( I did not measure that one). There you go, you now have a really cute card.
Blessings,
Carol
Thursday, March 17, 2011
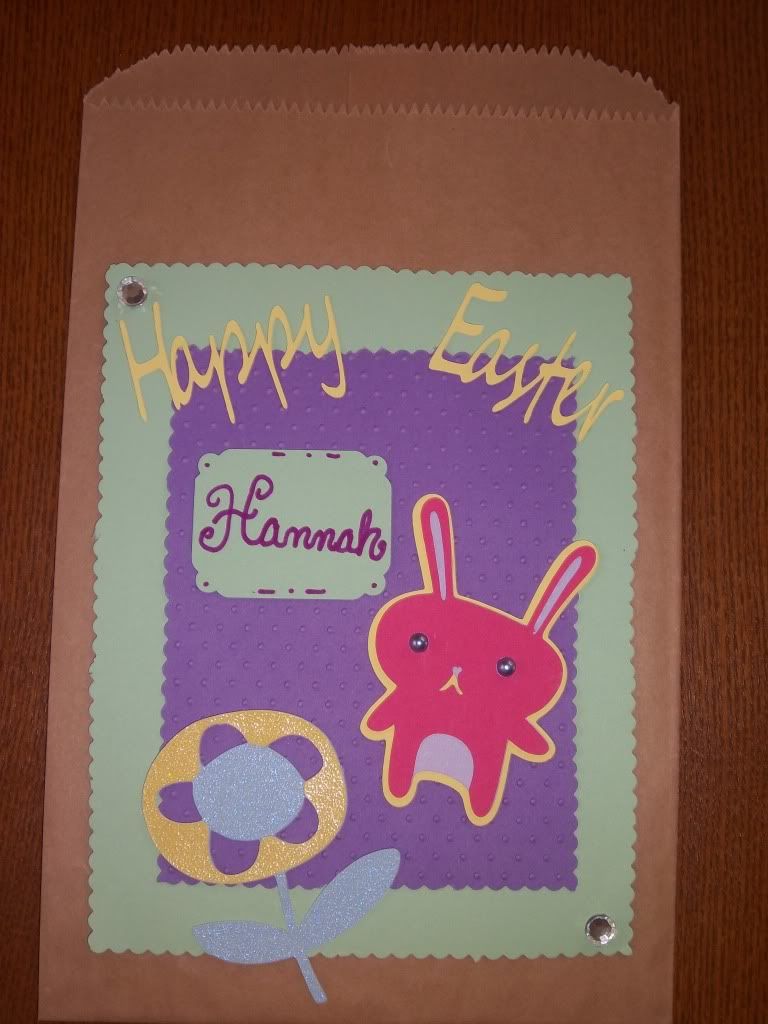
Easter Goodie Bag Made With The Cricut Cartridge "Give A Hoot"
Good afternoon everyone!! Hope you all are having a nice day. Here in Northern California, we actually have a bit of sunshine. This winter has been crazy. Our rainfall totals are over our normal. So needless to say, my little family feels a bit water logged.
Anyways, today I am posting a really cute Easter Goodie Bag using the Cricut Cartridge "Give A Hoot". This was fun and easy to make. This is part of mypinkstamper.com Blog Hop. The paper bag that I used are ones that I have had for about 5 years. When I purchased them it was cheaper to get 500 count than smaller amounts. This project is using what you have in your scrapbooking creative room!! My hope is that you all will enjoy this project.
Supplies Needed;
Cricut Cutting Machine
Cricut Cartridge; Give A Hoot
Solid and Sparklie Cardstock
Sparklie Gems & Pearls
Sure Cuts A Lot or Design Studio
Blade 6, Speed Low or Med, Pressure High
Instructions;
With your solid cardstock cut a 5.5 X 7 in mat and a 4.5 X 6 in mat (emboss this one). With the embossed one use decorative scissors to cut the part that did not get embossed. Cut 2 X 1.5 in mat for writing the name.
Cut 1- 3 in Rabbit 1 and (shift), and (shadow). Cut 1- 3 in Rabbit 1 (accent) and (accent shift) for the flower. Make sure to use the multi cut on the flower pieces. The sparklie paper need the extra cut.
I used my Sure Cuts A Lot program for the words "Happy Easter".
Start putting large mat then the smaller embossed mat on the paper bag. Assemble the images glue to the mats as shown in the photo. Add the sparklie gems and pearls. Write name.
If you don't happen to have or find paper bags like this just used the ones for lunches. I have some on those lunch bags from Sams Club near my home.
I loved this creation. My children are going to be sooo excited to get this filled with candy in their Easter Basket this year.
Blessings,
Carol
Wednesday, March 16, 2011
A Huge Thank You To Sheri At My Sheri Crafts Blog
Sheri gave this to me the other day (Ooo-La-La ) located under my received blogs, and I am so very blessed to receive it. I participated in one of her challenges. If you have not stopped by her blog you must. The challenges are fun. All the people who share the ideas are wonderful!! I am truly inspired by their creativity. Just click on this link http://myshericrafts.blogspot.com/ and it will take you over to Sheri's Blog. Have a Happy Creative Day!!
Blessings,
Carol
Blessings,
Carol
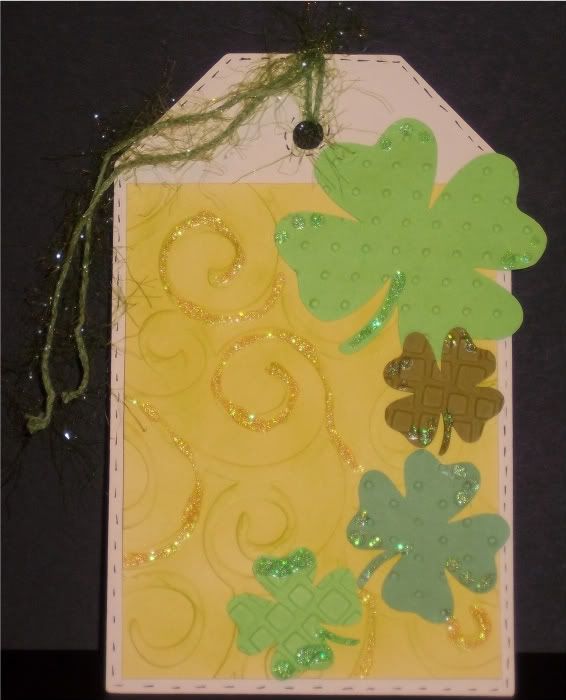
St Patricks Day Theme Challenge at My Sheri Crafts Blog
This is the second challenge this month with a St. Patricks Day theme. Honestly it has been quite fun. This theme has made me think out of the box. Plus, using my Sizzix Texture Boutique is a blast. Embossing is soooo much fun!! It really makes my projects "POP". My project is simple yet fun. Enjoy!!
Supplies Needed;
Cricut Cutting Machine
Cricut Cartridge; Winter Frolic
Solid Cardstock
Glitter Glue
Sure Cuts A Lot or Design Studio
Shamrock SVG File
Blade 6, Speed Min or Low, Pressure High
Instructions;
Cut 1- 3 in Girl 4 (tag) from Winter Frolic Cricut Cartridge, 4 different sizes of Shamrocks on the Sure Cuts Alot Program (No larger than 2 in). Also, I used the flip function on my computer program to get the shamrocks facing different directions. Really simple to do.
Cut a mat a little less than 3 in wide and little less than 4 in high. Then emboss it with a template you may have.
Place the mat on the tag. Add the shamrocks in the pattern which is shown in the photo. Use glitter glue to add the accents to the shamrocks and the embossed mat. Now, add some sparklie yard or thread through the hole. With a small tipped black pen draw stitching marks around the edge of the tag.
Blessings,
Carol
Tuesday, March 15, 2011
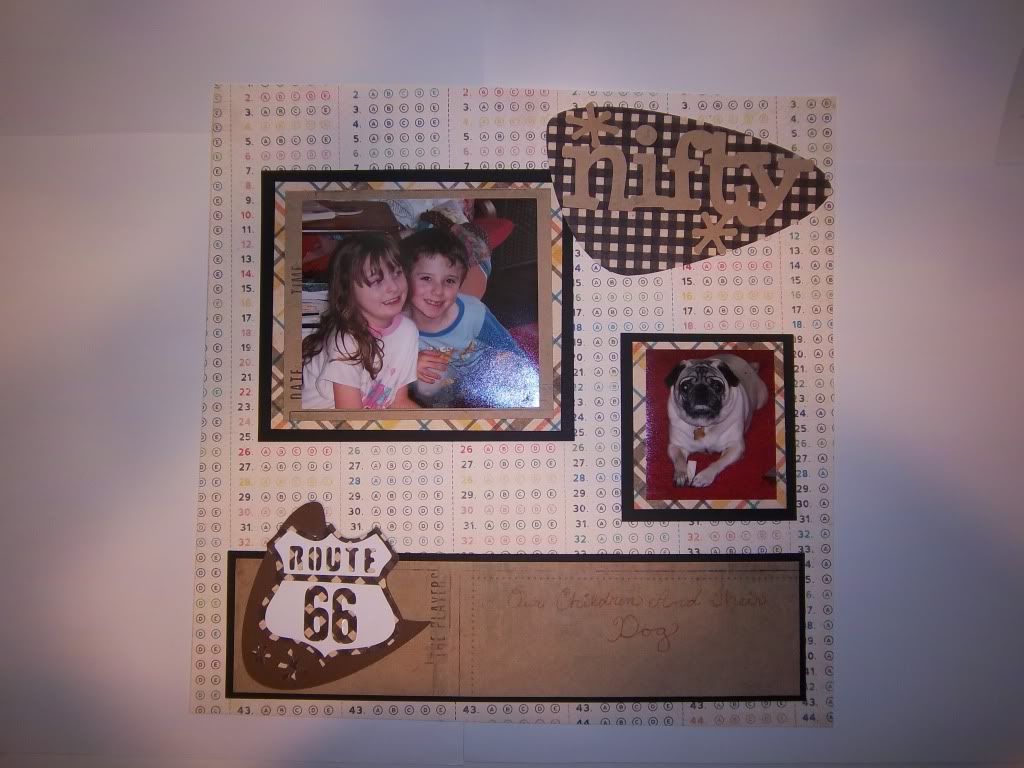
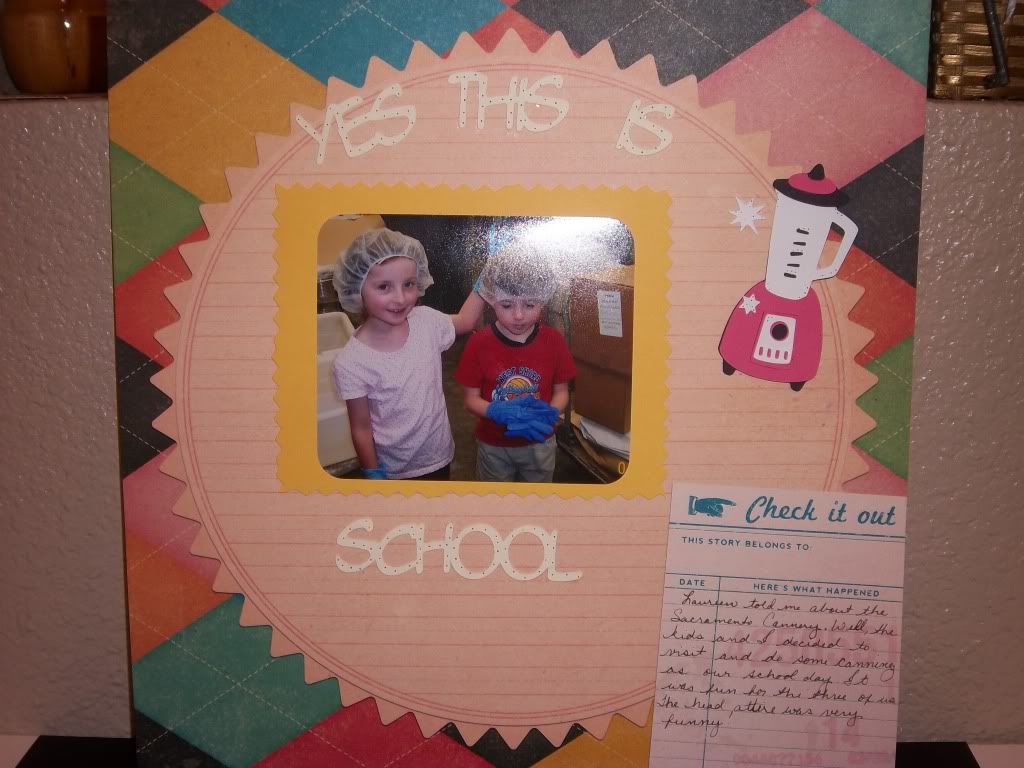
12 X 12 Scrapbooking Page Using Nifty Fifties
The other day I was working on pages for my 2009 Album. When I came to this specific photo I just started to laugh and was so glad that Nifty Fifties is one of my new cartridges from Cricut. The kids and I took a field trip for homeschool, at the Sacramento Cannery. We canned several different things. Very educational, we all learned a lot. Enjoy!!
Supplies Needed;
Cricut Cartridge Nifty Fifties
Printed and Solid Cardstock
Sure Cuts A Lot or Design Studio
Instructions;
Cut 1 - 4 in blender (all pieces), Cut 1- 2.34 in word "This is School"
When I cut the different pieces of the blender, on the mat I put the different colored pieces on the mat at once. This saves time for me.
Also the 12 X 12 paper is printed cardstock. It is the DCWV School Pack. I found this last Fall for only $7.00. Gotta love those deals.
Oh, almost forgot that what I journaled on is a scrapbooking library card. I bought a packet several years ago and have not used them all up.
Very simple and fun page. Think outside of the box, something different may appear before your very eyes.
Blessings,
Carol
Sunday, March 13, 2011
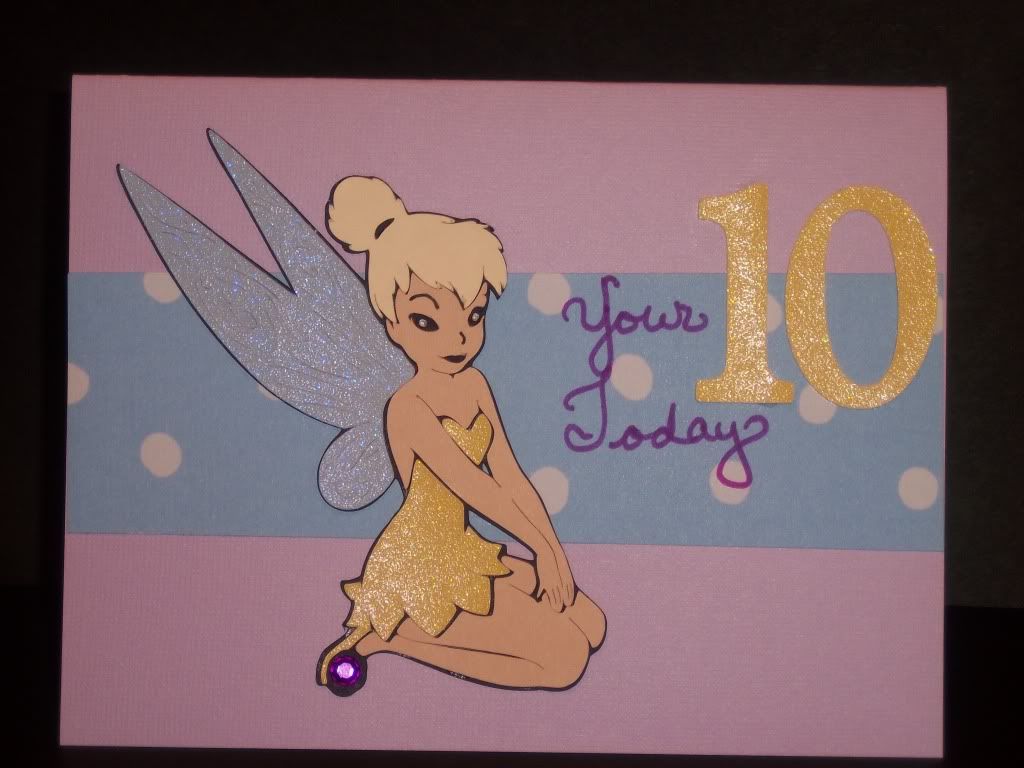
Tinkerbell Birthday Card For My Soon To Be 10 Year Old Daughter
I thought that my Tinkerbell and friends Cricut Cartridges needed to be opened and used. You see, we are visiting Disneyland in just a few weeks to celebrate the birthdays of my daughter and husband. Our daughter was born on my husband's birthday. What a gift indeed. Enjoy!!
Supplies Needed;
Cricut Cartridge, Tinkerbell and Friends, Plantin Schoolbook
Cardstock, Solid,Glittery, Printed
Sparklie Gem
Silver Gel Pen
Instructions;
Cut 1- 1 1/4 in, all parts of Tinkerbell. This includes the layers, hair clothes. Cut 1- 2 in #1 and #0 from the Plantin Schoolbook. For the clothes, wings and numbers use the glitter paper.
Assemble all parts of the image and use the silver gel pen for the iris of the eyes.
Make sure to cut a 2 in piece of printed cardstock and adhere to the card. I wrote the "Your Today" with my purple pen.
 I have found that I am more of an simple person. Totally understand there are many people who enjoy all the layers in every project. So, I am going way out of my creative box and create a very layered project. Keep your eyes open for that.
Blessings,
Carol
Supplies Needed;
Cricut Cartridge, Tinkerbell and Friends, Plantin Schoolbook
Cardstock, Solid,Glittery, Printed
Sparklie Gem
Silver Gel Pen
Instructions;
Cut 1- 1 1/4 in, all parts of Tinkerbell. This includes the layers, hair clothes. Cut 1- 2 in #1 and #0 from the Plantin Schoolbook. For the clothes, wings and numbers use the glitter paper.
Assemble all parts of the image and use the silver gel pen for the iris of the eyes.
Make sure to cut a 2 in piece of printed cardstock and adhere to the card. I wrote the "Your Today" with my purple pen.
Blessings,
Carol
Friday, March 11, 2011
The Magic Number of 30 Followers Has Happened, Blog Candy to Give Away
Well, Thank you to everyone who is following my blog!! I now can give away the fun Blog Candy to one of my followers. The Winner is; Ashley at Cricut Crazed Lady!!! Congratulations on winning my Blog Candy.
Keep on the lookout on my Blog for more Candy to come your way. I love having followers to share ideas with. Tell others about my blog.
Happy Creating!!
Blessings,
Carol
Keep on the lookout on my Blog for more Candy to come your way. I love having followers to share ideas with. Tell others about my blog.
Happy Creating!!
Blessings,
Carol
Wednesday, March 9, 2011
Mardi Gras Card
Over at My Sheri Crafts, we are doing a challenge with a Mardi Gras theme. I had to sit for a few moments and think where I could find something a bit different regarding images to use. There are alot of masks out there on the internet. So, I realized that my Cuttin Up Cricut Cartridge had a martini and let' party words. This worked out great! Enjoy.
Supplies Needed;
Solid and Sparklie Cardstock
Sparkle Pearls
Silver Gel Pen
Embossing Machine (I have the Sizzix Texture Boutique)
Cuttin Up Cricut Cartridge
Red and Green Sparklie Glue
Cricut Cutting Machine
Speed low or med, Blade 6, Pressure High
Instructions;
Cut 1- 4in Martini Glass with Olive (multi cut), Cut 1- 2 3/4 in Let's Party Words
For the Martini Glass I used sparklie cardstock, make sure to use the multi cut. The sparklie cardstock wont cut well with just one cut.
With your mat for the card, run it through the embossing machine. Any image will do. Place on the card, adding the lines and dots on he mat.
Now use the sparklie glue to make the olive green and the letters red. Add sparkle pearls.
This card sat overnight to make sure it was dry.

Have fun with this. Use another image and wording. Think outside that box.
Blessings,
Carol
Tuesday, March 8, 2011
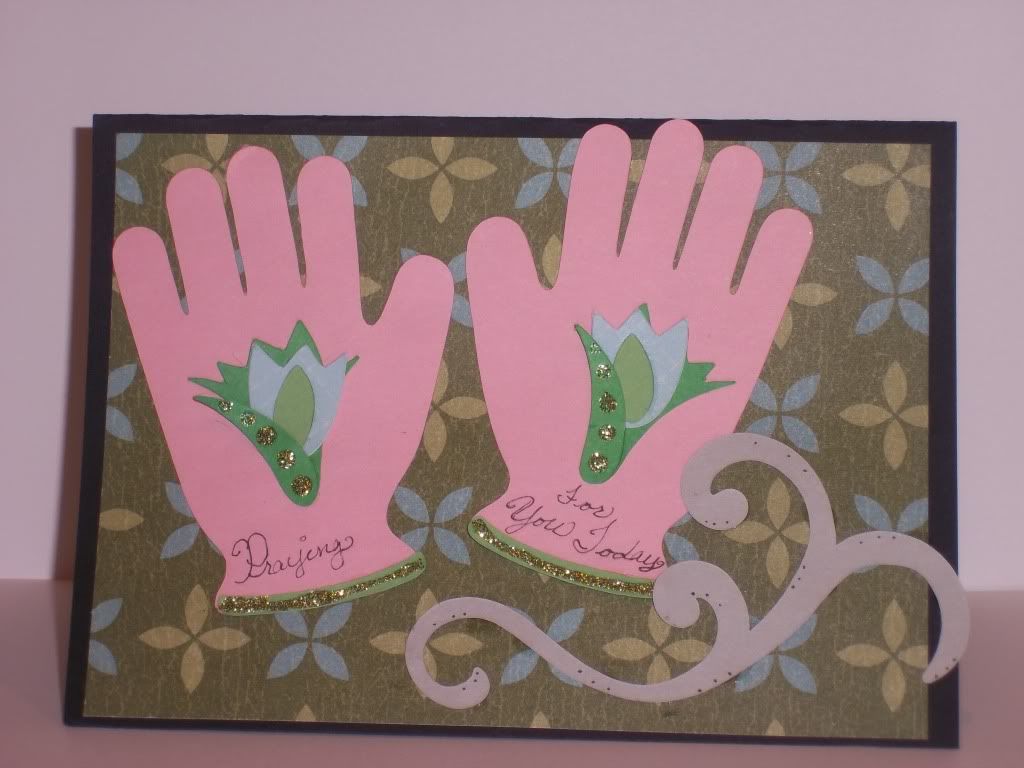
Thinking of You Card Using the Freshly Picked Cartridge
I made this pretty card for friends at our at church. They are currently going through a life trial and thought the card would lift them up. Since my husband purchased the Cricut Expression for me in November of 2009, making cards is the norm now. The cards are made with love and better quality than a store bought one any day of the week. Our friends just love that fact that they are handmade. The cartridge which is used is the Freshly Picked and a scroll from the Serenade. The Serenade is one of the two cartridges which came with my Cricut. For a long time I could not afford to purchase any cartridges. So, I became super creative and thought up all types of ways to used the images. Remember think out of the box when creating.
Supplies Needed;
Cricut Cartridges; Freshly Picked and Serenade
Cardstock Solid and Printed
Sparklie Glue
Cricut Cutting Machine
Instructions;
Cut 1- 3 3/4 inch each of Freshly Picked, Gloves 2, Gloves 2(shift), Gloves 2 (layers), and Gloves 2 (Layers shift). Cut 1- 1 3/4 in scroll from the Serenade Cartridge.
Make a mat for the card from the printed cardstock.
Put everything together and place on the card. Then, just add your sparklie glue and little dots on the scroll.
Enjoy!!
Blessings,
Carol
Sunday, March 6, 2011
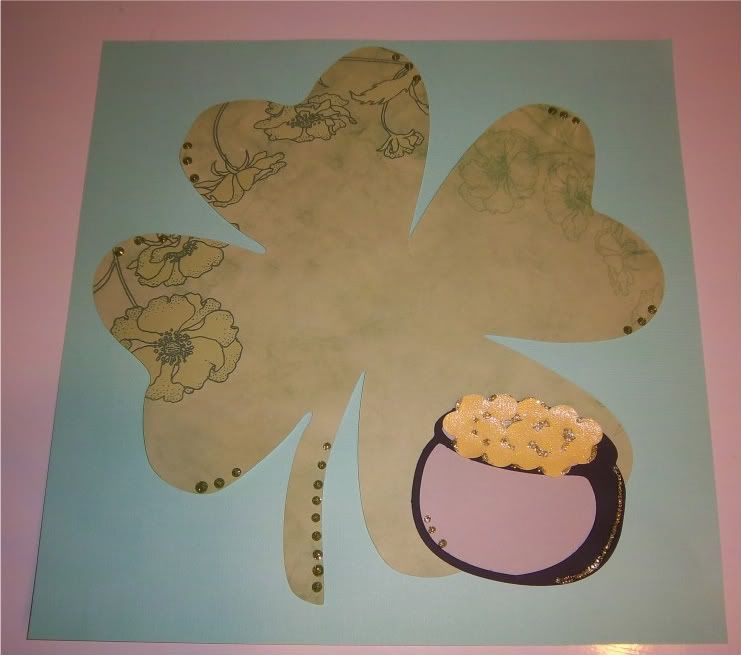
Luck of The Irish Challenge
Over at the Creative Scrapbooking Diva Site (I have a link on the right side of my blog), I am participating in the "Luck of the Irish" challenge. This 12 X 12 page was very simple and fun. You could even make a large flower and create the same idea on the page. Think outside of the box, for you never know what will appear. Enjoy!!
Items Needed;
Cardstock (solid) and Printed Paper
Sparklie Glue
Cricut Expression Machine
SVG Files
Sure Cuts A Lot or Design Studio Program
Instructions;
On the internet I searched and found 2 SVG files. The shamrock and pot of gold. To make the shamrock large, I grabbed one corner and about filled the 12 X 12 screen mat. The pot of gold was about 6 inches. Cut everything out and glue together, then onto the 12 X 12 solid piece of cardstock.
For the sparklie accents, just add where I did or put them somewhere else on the page.
Blessings,
Carol
What is coming up the next couple of weeks
Hi everyone, hope your weekend has been a good one. Ours in California has been overcast and today pretty rainy. Later this evening I will post a project. Girl Scout site sales is keeping us busy. Yes, it is "Cookie Time" again. This week I will be figuring out how to get a video and posting one of those.
Also, a big thank you to those following my site. I truly appreciate your comments, friendship and creativity. I want to give away my Blog Candy soon. If you would not mind, let people know about my site. I am hoping to hit 30 followers soon, so the goodies can be given away.
Enjoy the rest of your Sunday.
Blessings,
Carol
Thursday, March 3, 2011
Boy 12 X 12 Page
I decided to start joining in at My Sheri Crafts blog challenges too. Wow, that is two challenges a week for me. Just loving the fact I get to create is a "HUGE" stress reliever. Including keeping my little creative brain well oiled. This weeks challenge is Boy themed. Enjoy!!
Supplies Needed;
Cricut Cartridge; Serenade
Sure Cuts Alot or Design Studio
Printed and Plain Cardstock
Cut 1- 4 in Branch 2 and Branch 2 (Layer), Make sure to use the flip button.
Cut 1 Boy image from a SVG file. (I found this one free online). Then I distressed the Boy.
The letters are some that I downloaded from the Internet also. Oh, I welded the letters together.
The letters are some that I downloaded from the Internet also. Oh, I welded the letters together.
Just put everything together and you have a really nice page. Remember think outside of the box and who knows what you can create.
Blessings,
Carol
A New Award Today
Stacy over at Love That Bug blessed me with a new award. A Thing of Beauty Award. Totally excited. Please visit Stacy and check out her site, it is wonderful.
NOTE: Ladies when accepting this award, you must list 5 things about yourself (including why you like crafting), pass it on to 5 others, and when you post the award to your sidebar, the award creator would like the award linked to her: gracenotes4today. (Audrey)

5 New Things About Me;
- I have been sewing since I was 5 years old. My mother taught me.
- My church family is our family.
- Since my husband purchased the Cricut Expression for me, I am addicted to cardstock.
- Blogging has become a wonderful place to share my creativity.
- I really love the wonderful people that I have met in the blogging community.
Here are the 5 Creative Bloggers I am passing the award on to. Stop on by their blogs. These ladies are very creative and I am inspired by their creations.
She Scraps http://shescraps.blogspot.com/
Creative Diva http://creativediva98.blogspot.com/
Glendies Goodies http://glendie.blogspot.com/
Wednesday, March 2, 2011
Easter Scrapbooking Page
Well, I am currently working on 2009 Easter in my scrapbooking album. Yes, I am playing catch up. From the Nest is becoming quite a favorite in my book. There really are so many super cute images. Enjoy!!
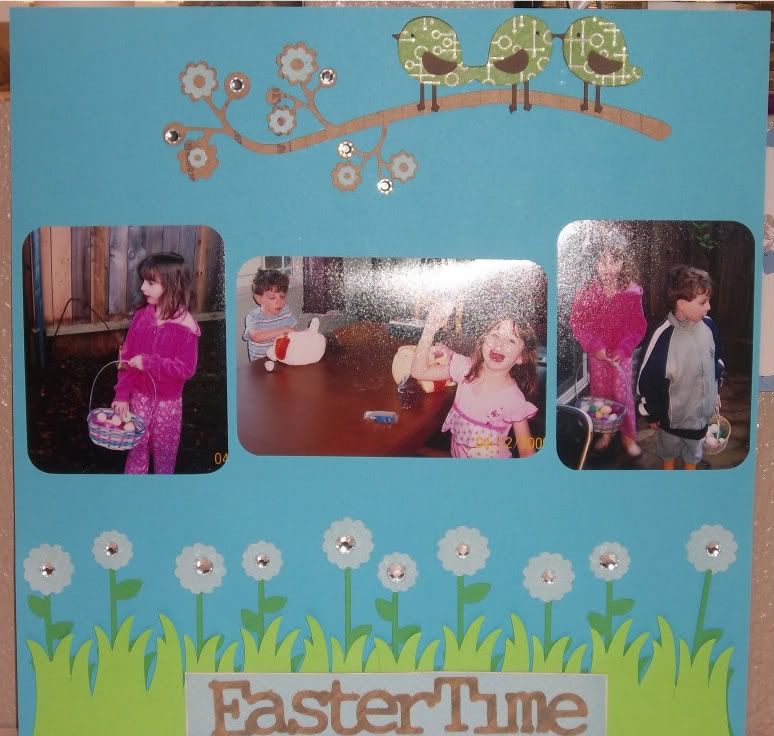
Love using the sparklie gems!! They just add that little extra.
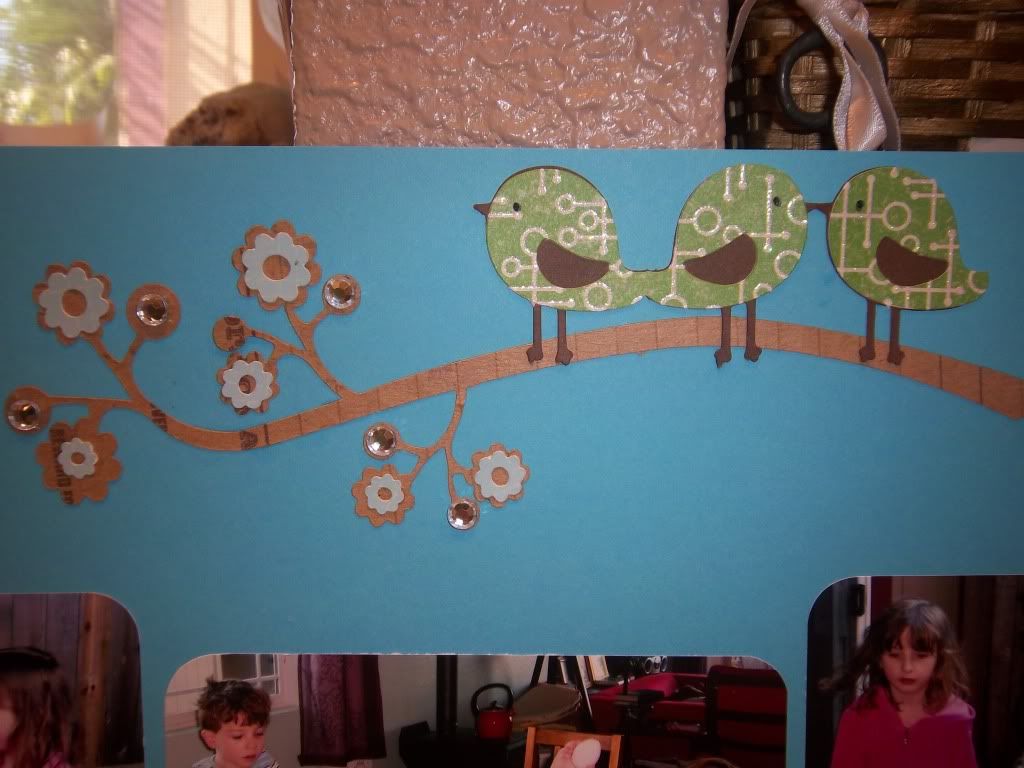
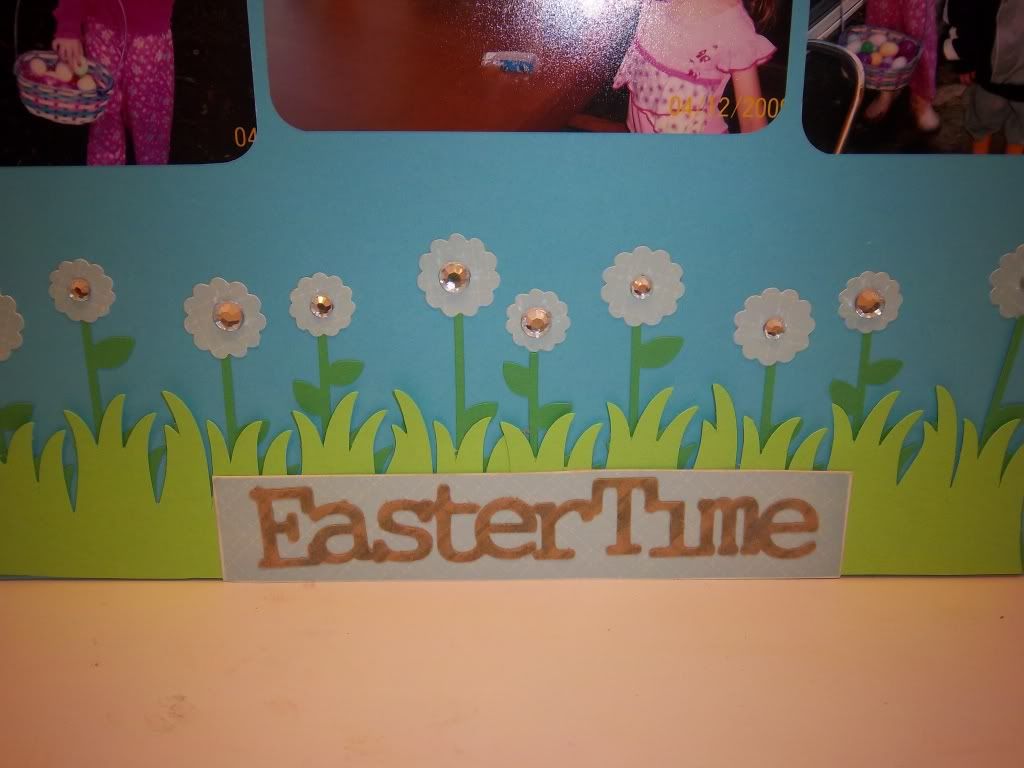
Supplies Needed;
Cricut Cartridge: From The Nest
Cardstock and Printed Cardstock
Design Studio Or Sure Cuts Alot program
Gems
Cut 2- 3 in Grass and Grass (shift), 2 - 3 in Gras (border shift), 1- 33.5 in Branch 2 (multicut 2) 1- 3.5 Branch 2 (shift), 1- 1.5 in Bird 1 (border), 1- 1.5 in Bird 1 (shift).
I used my Sure Cuts Alot program to weld the words Easter Time together. Have fun with this.
Blessings,
Carol
Monday, February 28, 2011
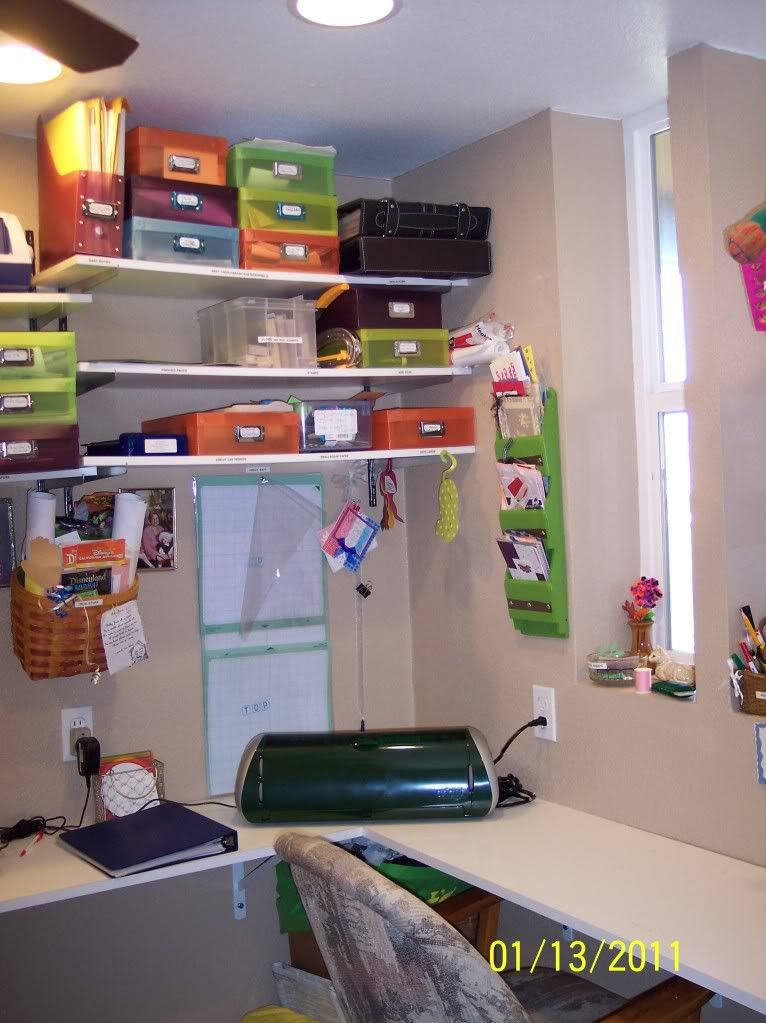
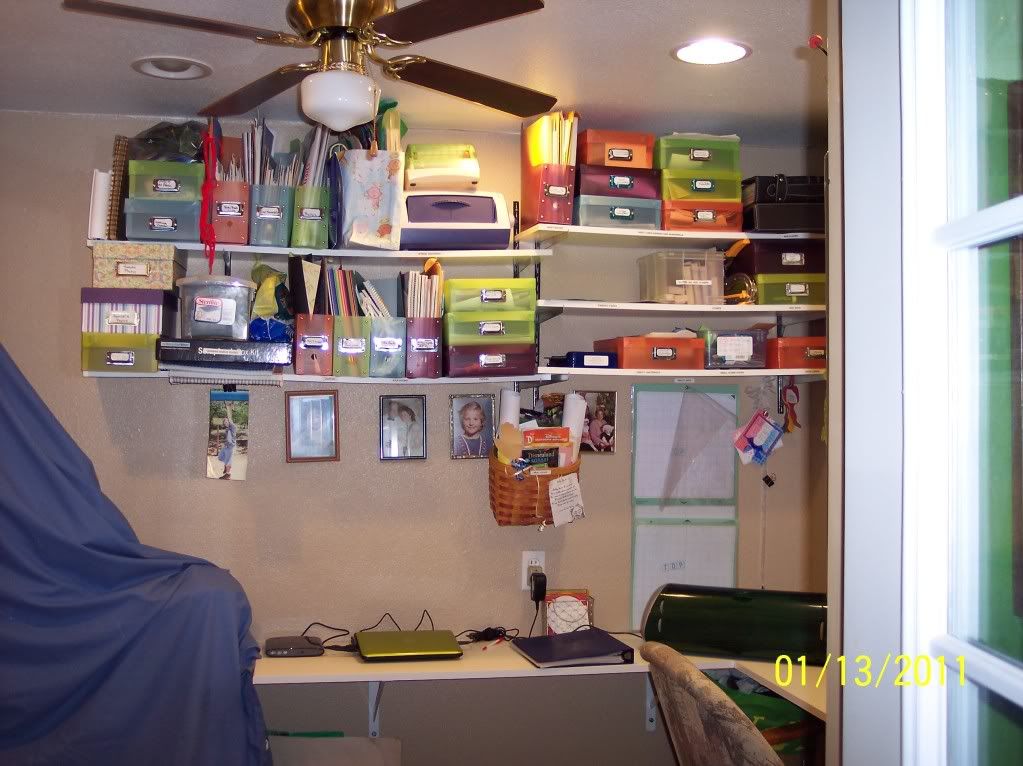
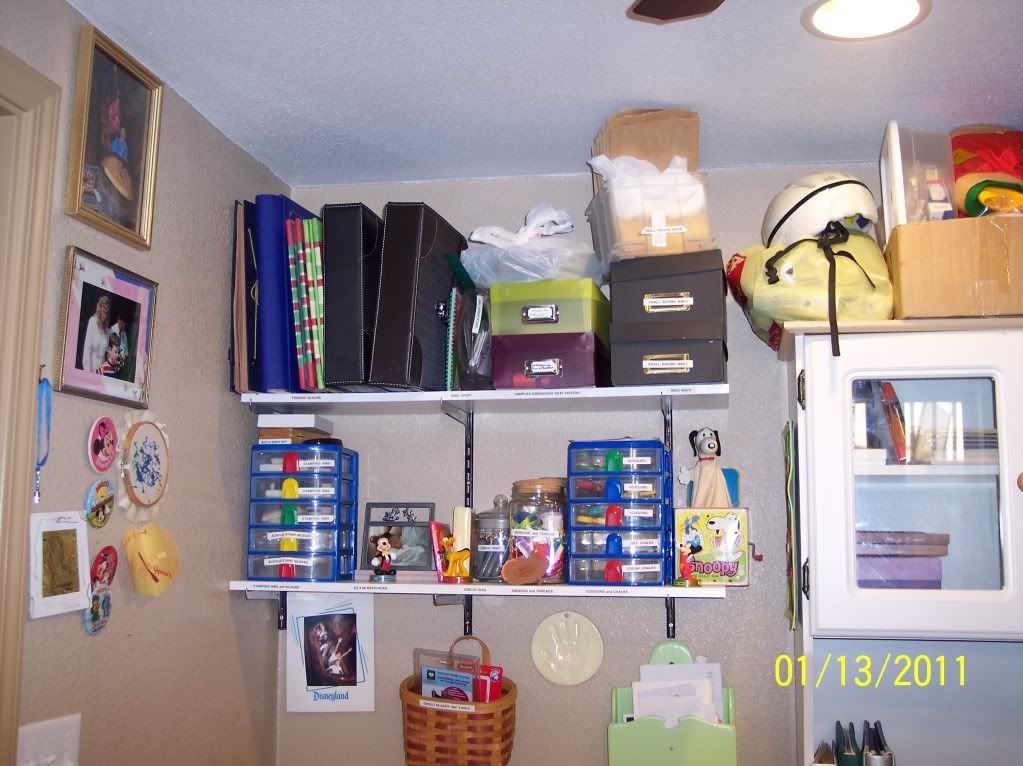
Scrapbooking Room, "How I love Thee"
We all have our special little place in which the creative moments happen. Mine is very very small and chocked full of great things to work with. Several years back my husband (who is a contractor) put up all the great shelves in there. They are full as you can see. Not only is this my place, but my children are scrapbookers and crafters also. Boy am I blessed! I would love to see what your creative places look like. Make a post with a link to your photo or site. Have a wonderful day in your special creative place.
Blessings,
Carol


Subscribe to:
Comments (Atom)